Mail merge from Excel to Word
Before starting the mail merge, users should know what is mail merge and why it needs. This chapter is all about mail merge and how to do it in Excel. In this chapter, we will try to elaborate on the mail merge process from Excel to Word.
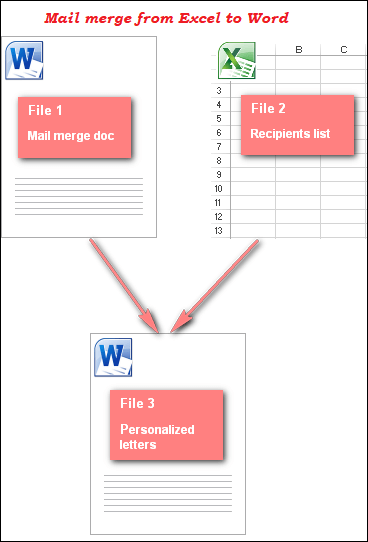
The mail merge process basically includes the three documents in this process, i.e., template, source, and final document. If you are not even aware about mail merge, you will learn it too.
An Excel user should know that the mail merge operation does not perform from Microsoft Excel. The MS Excel sheet is only used as a source file, but the merge is actually performed from Microsoft Word.
Topics covered in this chapter
- What is mail merge?
- Basics of mail merge
- Components of mail merge
- Where to use mail merge?
- How does mail merge work?
- Steps to create mail merge
- Things to know while prepare mail merge
What is mail merge?
A mail merge is a way to quickly create and send the bulk of personalized emails or letters. You do not need to create an email from the Email application. It works automatically and takes the data from the sheet to the template file. The template file can be a letter or email.
Basically, the mail merge allows the users to create a personalized document that varies from recipient to recipient. The users do not need to compose the individual email template/ letter for each user. Mail merge can do it easily without creating the mail separately for each recipient.
You can create an email/letter for hundreds of recipients at once. This chapter will guide you to create mail merge from Excel to Word.
Basics of mail merge
Mail merge is a simple process of creating and sending bulk customized emails or letters to different users. Before learning the mail merge process, it looks a very tough task to do. You can understand it easily if you think the mail merge in terms of three documents.
- A Word document that contains the data with customizing fields for personalized mail/letters.
- Excel file is a source file here that contains information about the recipients in the columns to be merged with Word document. One row for each recipient. These source file data are replaced from the fields inside the code of Word document.
- The third and last one is another Word document that is the final document prepared from the above two files. It is basically the personalized document to be sent.
The main purpose of mail merge from Excel to Word is to use file1 (Word file) and file2 (Excel document) to create a third file.
Components of mail merge
Mail merge has two essential components that a user should know –
- Data file
- Template file
Data file
The data file is a source file that contains the data (like name, address, phone number) in the spreadsheet. This data file can be an Excel spreadsheet or Google sheet. The data of the data file is used inside the template file to create personalized email or letters.
“By defining the format for mail or letter, mail merge automatically takes the data from the Data file and place in the template file for personalized template of mail.”
This one is the sample data file that we will create in this chapter below:
Template file
A template file is a document that holds the message to be sent out. It can be email or letter template. In this document, we have to specify where the personalized data will place. The personalized data like name, address, and phone number is fetched from the sheet or you can say data file.
This one is the sample template file that we will create in this chapter below:
Where to use mail merge?
A mail merge can be used for creating the following personalized message, i.e.,
- Making Emails,
- Newsletters,
- Custom Catalogs, and
- Form letters, and more.
How does mail merge work?
When a mail merge runs, Excel sheet (source) gets connected to the Word document (template file). After connecting both files, the Word document pulls the data from Excel sheet and places them in place of inserted fields.
So, before start the mail merge process, ensure that the Excel file contains all the information you need in Word document to create a personalized email/letter.
Steps to create mail merge
The mail merge process has three most important steps to prepare the mail merge from Excel to Word, i.e.,
- Prepare Excel spreadsheet
- Prepare template file in Word
- Create mail merge document
- Preview the mail merge
- Finish and save the mail merge
Prepare Excel spreadsheet
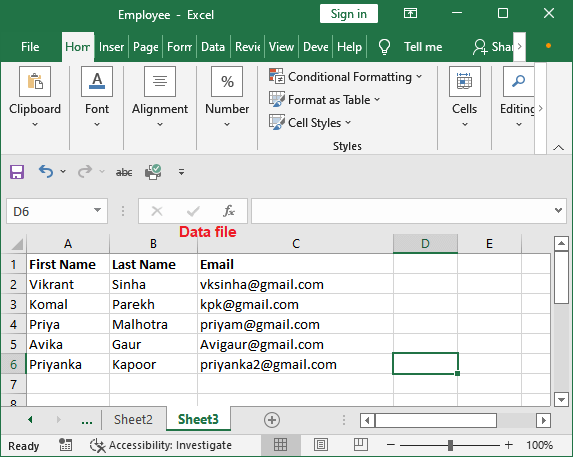
First of all, we will prepare the source data in an Excel spreadsheet from which the customize mail/letter template will create. We will create three columns named First Name, Last Name, and Email for this example.
Step 1: Create the heading in the first row of the Excel sheet and insert the data in the below cells.
In this Excel worksheet, we have stored the following data. This data will be used inside the template file. The data file must contain the heading that will use in template file as fields to fetch the data from this file.
Prepare template file in Word
After creating the source data file and preparing data, the next step is to prepare the template file in Word document. To create the template file in Word document, follow the steps given below:
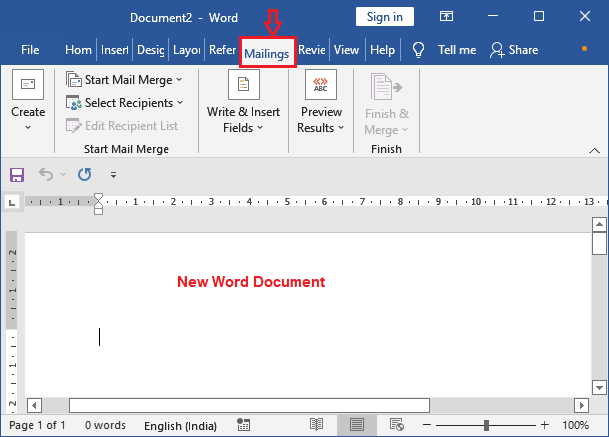
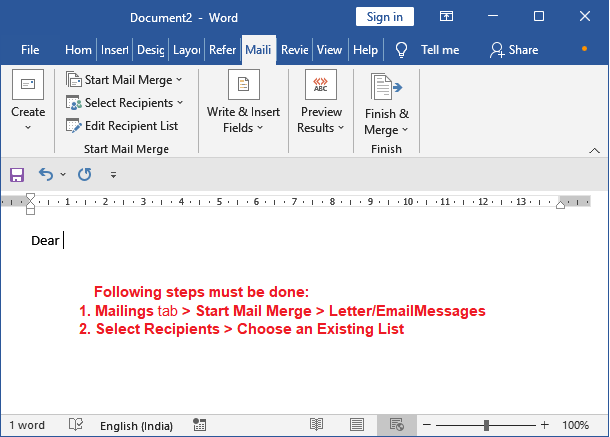
Step 1: Create a new Word document on which navigate to the Mailing tab.
Step 2: Click on the Start Mail Merge button and select Email Messages to create the mail merge for personalized email.
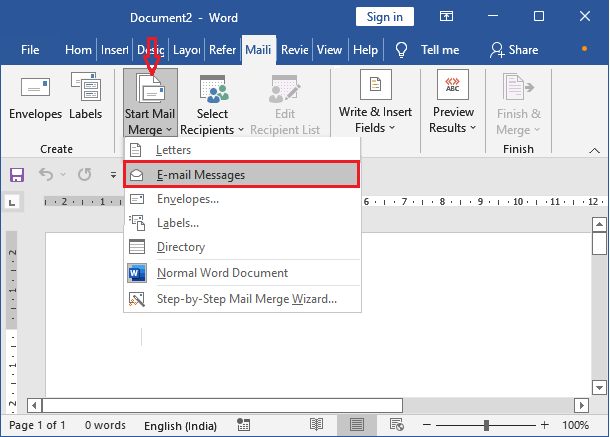
You can also select letter to design the personalized letter. We had selected Email Messages for email.
Connect the Excel sheet with Word
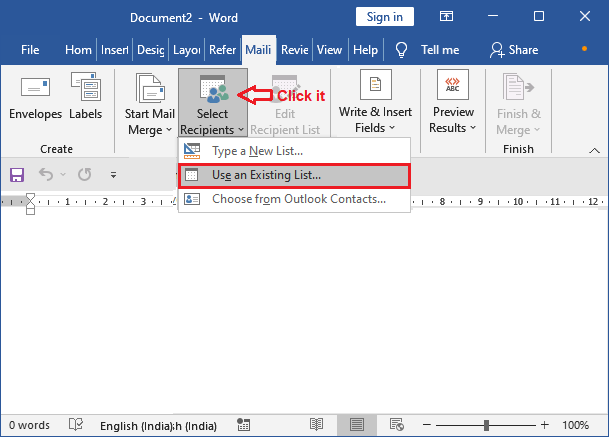
A new Word document for writing the customized email will open from the previous steps. Next is to connect your prepared Excel sheet with a Word document.
Step 3: On this new document, click the Select Recipients and then choose Use an Existing List.
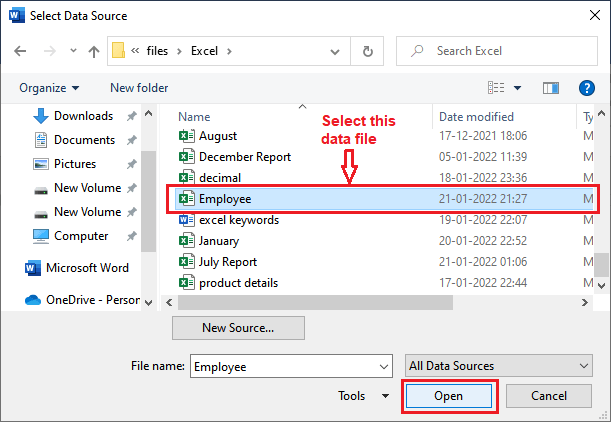
Step 4: You will navigate to the local storage to choose the Excel file. Choose the Excel sheet from your system and click the Open button.
Step 5: The data we had created in the Excel file is stored in Sheet3. So, here we will select Sheet3 and click OK.
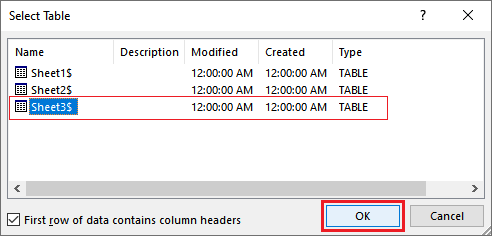
After completing of these steps, our Excel sheet is now linked to the Word document.
Insert the fields into Word document
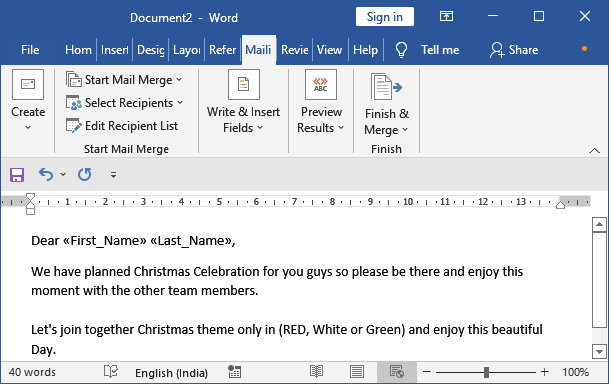
Start writing the mail which you actually want to place inside the mail body while sending the mail. For this, you will need the field for the personalized mail, such as first name, last name, or email address. You have to insert the right field at the right place in Word document.
Step 6: We start writing the mail content. Now. Here we want to insert the first name and last name of the recipient.
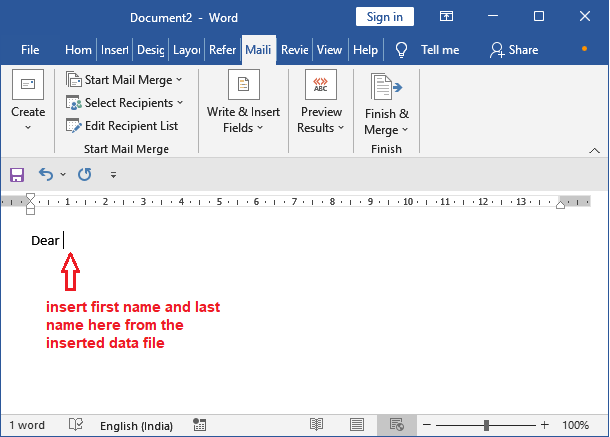
Leave the cursor where you want to insert the field and follow the step 7 repeatedly.
Step 7: Inside the same Mailing tab, click the Insert Mail Merge and select whatever field you want to insert wherever in the Word file.
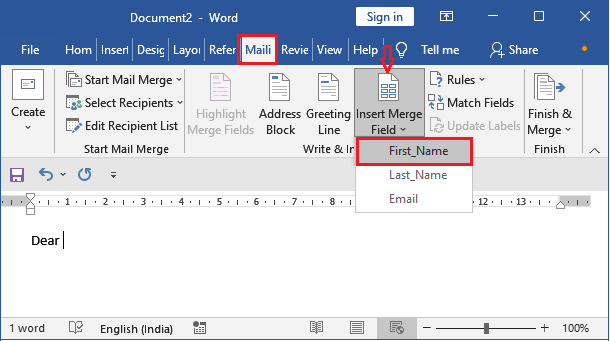
Step 8: First name field is inserted. Now, again click the Insert Merge Field dropdown button and select the last name field name this time.
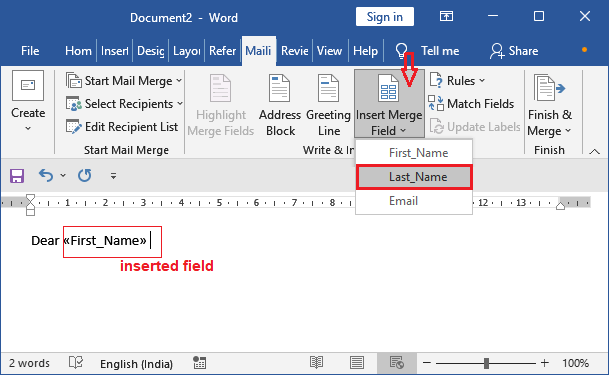
Step 9: Another field has been inserted into the template Word file. Continue writing the mail content and insert the other or same fields wherever you want to insert.
Preview the mail merge
After setting up the mail merge, you can preview the created mail merge that everything is set up as you want.
Step 10: On the Mailing tab, click the Preview Results.
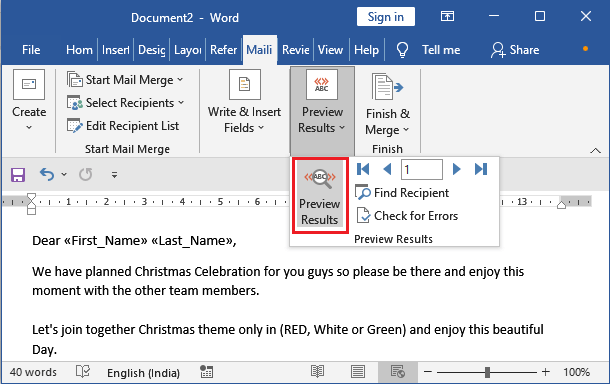
Step 11: Once you click the Preview Results, the first record will show you automatically. The first name and last name are replaced with the first employee detail.
See the document below:
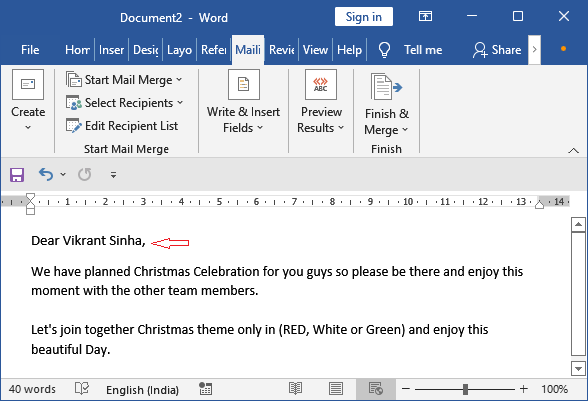
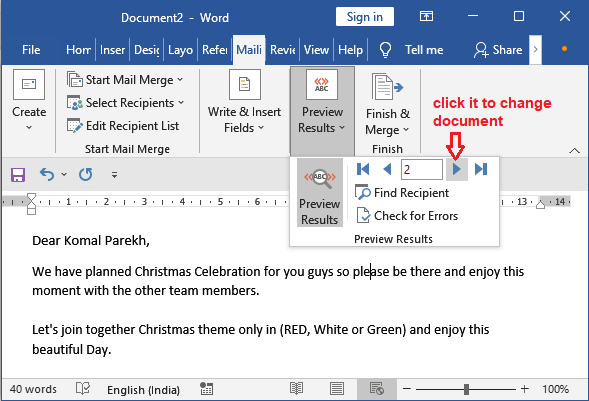
Step 12: To see the other document, click the next and previous icon to change the document.
Our template file has been prepared and ready to send. Now, you can save this document in your storage.
Finish and save the mail merge
It’s time to finish the mail merge and save the created template document.
Step 13: Inside the Mailing tab, click the Finish & Merge button. You will see different options there.
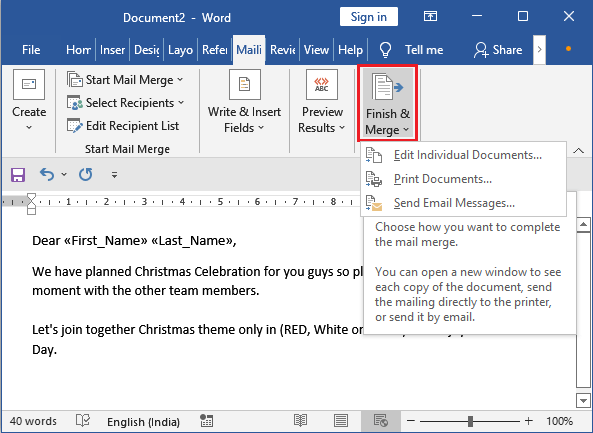
Choose the best option you want, i.e., print, save or send the all-personalized prepared document.
Step 14: Choose Edit Individual documents.
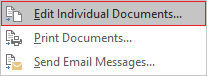
You can also select Send Email Messages to send the created document.
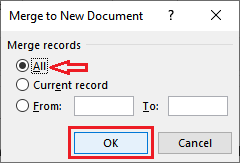
Step 15: A small window panel will open on which keep selecting the All radio button and click OK.
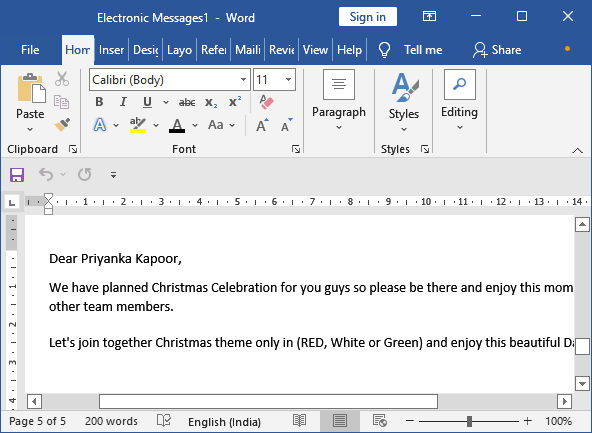
Step 16: A new Word document is created for all the recipients. Now, you have separate mail templates for individual recipients. You can print or save the document using Ctrl+S.
You can save the document and close the files when all the steps are done.
Exclude the recipient
There can be a large list of records but you do not want to send the created personalized mail to all the recipients. The users can exclude the recipient directly from the Word file without deleting the record from the Excel sheet.
To Exclude the one or more records from the list inside the data file you had added, you can follow the below steps:
Step 1: On the same Mailing tab, click the Edit Recipient List.
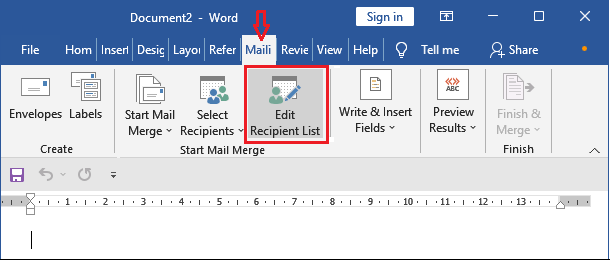
Note: This “Edit Recipient List” option will only be enabled when the Excel sheet will connect to the Word document. Otherwise, this option will be disabled.
Step 2: A Mail Merge Recipient window panel will open where you can remove the recipient by unmarking the checkbox corresponding to their record.
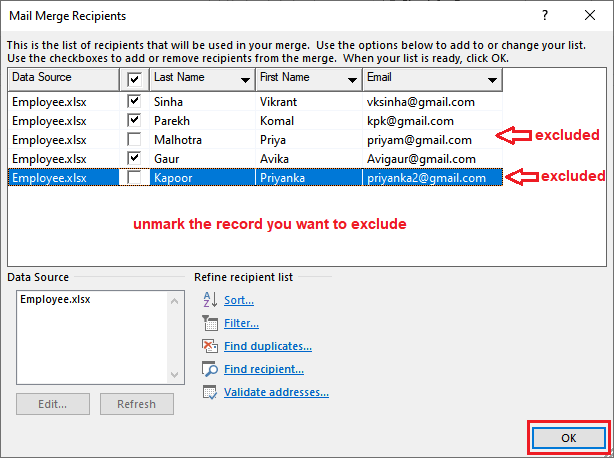
Step 3: After getting all the things done, click the OK button on this panel.
The recipient list is updated even without deleting the record from the Excel sheet. It means the personalized mail/letter whatever you prepared, does not customize to excluded records.
Things to know while prepare mail merge
The following things you should know while creating a mail merge.
- All fields of the Word document should be available in the Excel sheet. It means that the column names should match with the fields in the Word file. For example, firstname, lastname.
- You must create the header row in the Excel sheet, which will later use in the template file.
- If your source Excel sheet contains the date, time, currency, or postal code that either begins or ends with 0, format them properly before merging. So, the values can be read correctly by MS Word.
- All the data you will use mail merge should be in first spreadsheet of your Excel workbook.
- If you want to make changes in the spreadsheet data, it should be done before connecting it to a Word document for mail merge.
Insert personalize message
Excel offers three variables that you can use to insert into a Word document. These three variables are Address block, Greeting line, and Merge fields. In the above mail merge example, we have inserted merge fields in the personalized email we had prepared.
Address block
This address block is used how you want to address the recipient while you are creating the mail merge. For example, Mr., Mr. & Mrs., or want to use short form of the name, etc.
Greeting line
The greeting line variable is used in template file to get the personalized greeting line or salutation for different recipients. The greeting line is basically how you want to start the conversation, like To or Dear.
Merge fields
Merge field is useful when you are using another document data like MS Excel sheet as a data file. You are using it to fetch the data as field values from that file. Excel column headings are treated as merge fields whose corresponding cells data are fetched from the sheet.
Insert an address block
Suppose that you have performed the steps to create mail merge till writing the mail merge. Only after that you can insert the address block, greeting line, and merge fields.
When you want to give any specific way to address the recipient, you can use the address block variable in the Excel sheet.
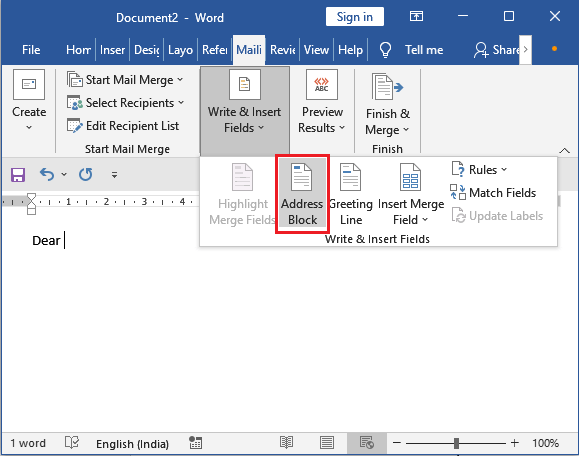
To insert the address block, click the Address Block option inside the Write & Insert Fields on the newly created document for mail merge.
A panel will open where specify the address elements by selecting one of the formats and click OK.
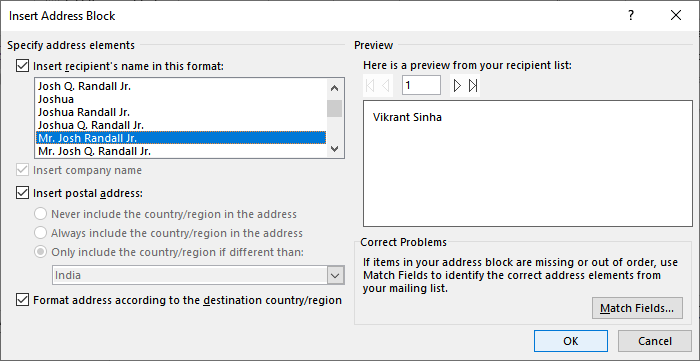
The address block has been successfully inserted into the template file.
Similarly, you can insert the greeting line. See the steps for it too.
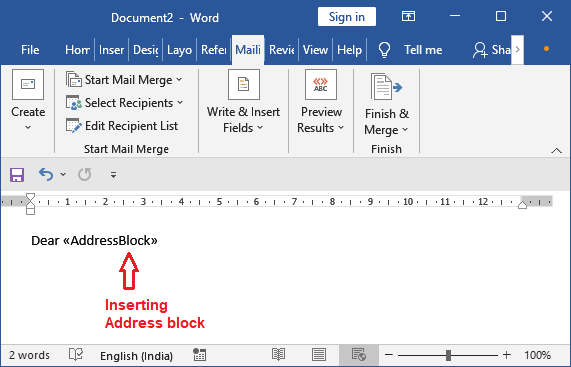
Insert the greeting line
We are just giving a demo. You can use these variables as per your convenience.
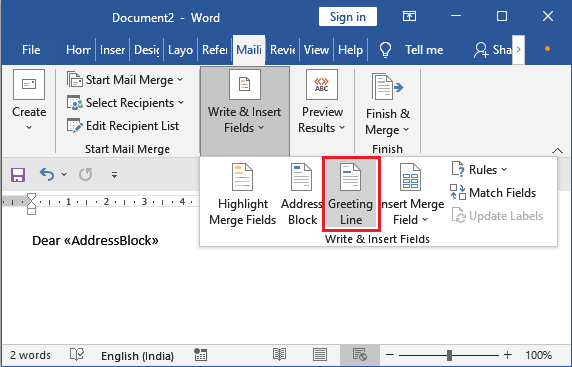
To insert the greeting line in the template file, click the Greeting Line option under the Write & Insert Fields.
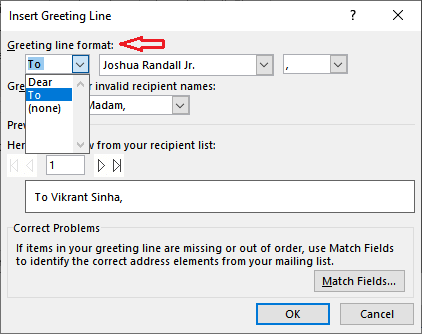
A panel will open where you choose the greeting line format and click OK.
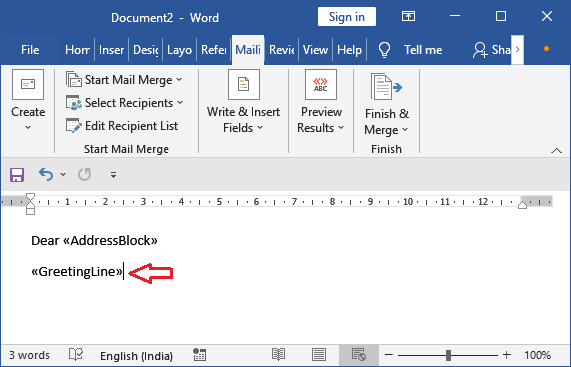
See that the greeting line variable has been inserted into the template file.
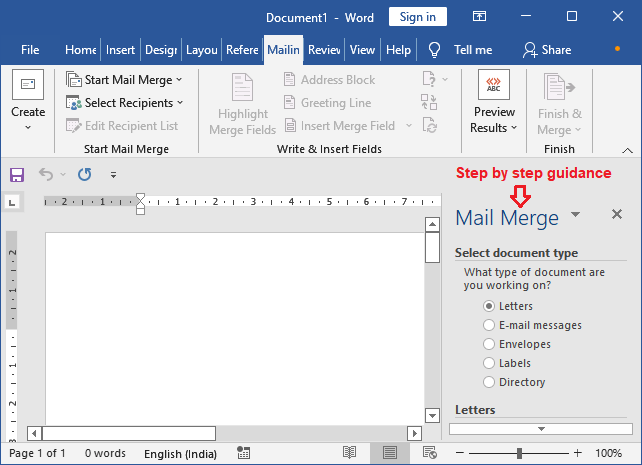
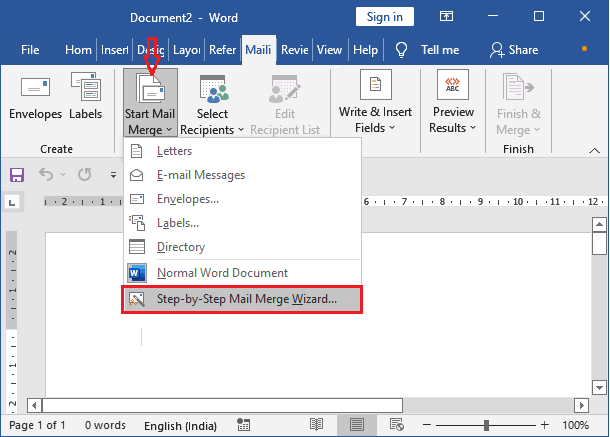
Create mail merge using wizard
All the needed steps for creating mail merge, we have described above. You can easily create a mail merge from Excel to Word using these steps. Hope you will not stuck on any step.
Besides this, MS Word also provides step by step guide. You can also follow that. You can also use that. You will find that option when you start the mail merge process.
On the Word file, click the Start Mail Merge and select Step-by-Step Mail Merge Wizard inside the Mailing tab.
A panel will enable on the right side of Word document, which shows you step-by-step guidance to prepare the mail merge. See the screenshot below: