How to Wrap Text in Excel?
Microsoft Excel is designed to calculate and manipulate numbers. In case the longer text does not fit in a cell, you can proceed with the most obvious way and make the column wider. However, it’s not an option when you work with a large worksheet with a lot of data to display.
A much better solution is to wrap text that exceeds a column width, and Microsoft Excel provides a couple of ways to do it. When the data input in a cell is too large to fit in it, one of the following two things happens, such as:
1. If columns to the right are empty, a long text string extends over the cell border into those columns.
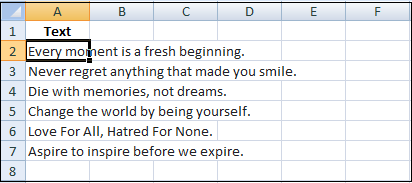
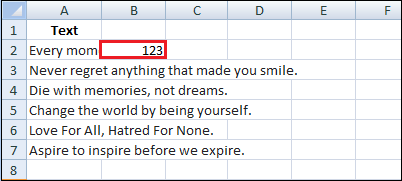
2. If an adjacent cell to the right contains any data, a text string is cut off at the cell border.
The wrap text feature in Excel can display longer text in a cell without overflowing to other cells. Wrapping text means displaying the cell contents on multiple lines, rather than one long line. This will allow you to avoid the truncated column effect and make the text easier to read and better fit printing. Also, it will help you keep the column width consistent throughout the entire worksheet.
How to Wrap Text in Excel Automatically
To force a lengthy text string to appear on multiple lines, select the cells you want to format and turn on the Excel text wrap feature using one of the following methods.
Method 1: By Using Wrap Text Button
Here are the following steps to wrap the text using the Wrap Text button, such as:
Step 1: Select the cells for which you want to apply the wrap text formatting.
Step 2: Go to the Home tab and click on the Wrap Text button in the Alignment group.
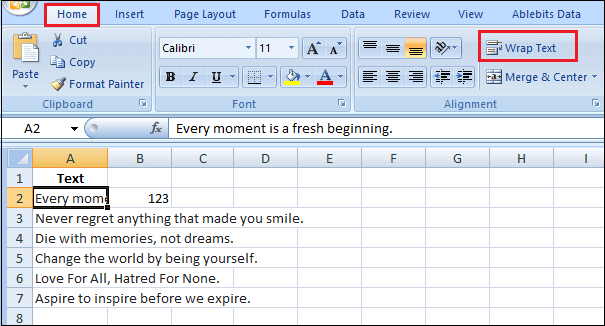
Method 2: By Using Format Dialog Box
Below are the steps to wrap the text using the Format dialog box, such as:
Step 1: Select the cells for which you want to apply the wrap text formatting.
Step 2: Go to the Home tab.
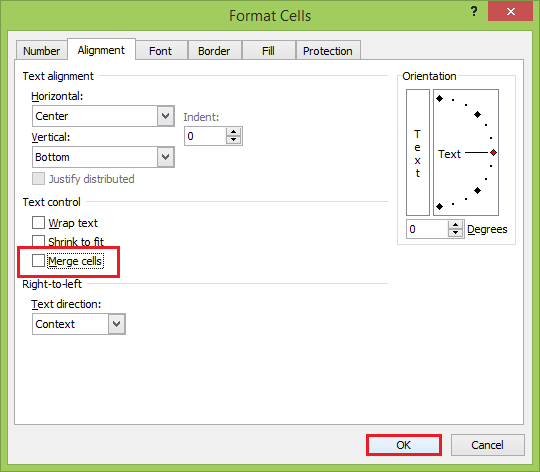
Or press Ctrl + 1 to open the Format Cells dialog, or right-click on the selected cells and then click on Format Cells.
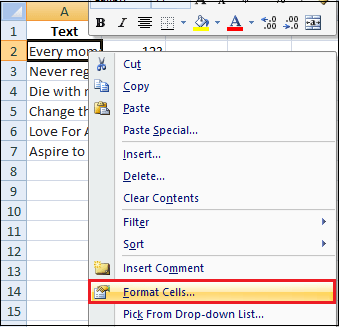
Step 3: In the Alignment group, click on the Alignment Setting dialog box launcher.
Step 4: In the Format Cells dialog box that opens, select the Alignment tab.
Step 5: Select the Wrap text checkbox.
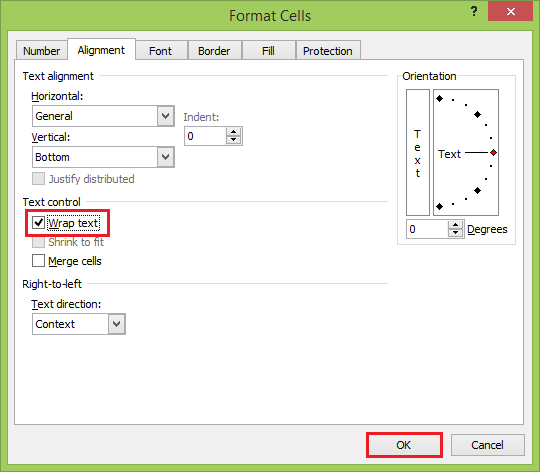
Step 6: Click on the Ok button.
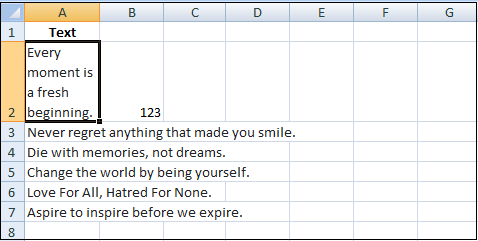
As a result, the data in the selected cells wraps to fit the column width. If you change the column width, text wrapping will adjust automatically.
Compared to the first method, this one takes a couple of extra clicks, but it can be useful when you want to change a couple of formatting settings. Since the Format Dialog box gives you access to all the formatting options, this may end up saving you some time.
NOTE: If the Wrap Text checkbox is filled in solid, it indicates that the selected cells have different text wrap settings, i.e., in some cells, the data is wrapped. In other cells, it is not wrapped.
How to Unwrap Text in Excel
The two methods described above are also used to unwrap text. Follow the following steps to Unwrap text in Excel, such as:
Step 1: The fastest way is to select the cells.
Step 2: Go to the Home tab and again click on the Wrap Text button in the Alignment group to toggle text wrapping off.
Alternatively,
Step 1: Press the Ctrl + 1 shortcut key to open the Format Cells dialog box.
Step 2: And clear the Wrap text checkbox on the Alignment tab.
How to Insert a Line Break Manually
Sometimes you may want to start a new line at a specific position rather than have long text wrap automatically. To enter a line break manually, do the following steps:
Step 1: Enter cell edit mode by pressing F2 or double-clicking the cell, or clicking in the formula bar.
Step 2: Put the cursor where you want to break the line.
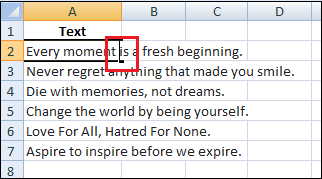
Step 3: And press the Alt + Enter shortcut key. Or press the Alt key, and while holding it down, press the Enter key.
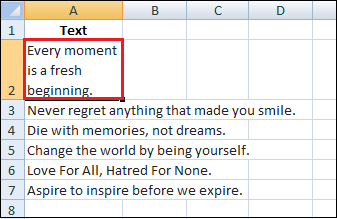
As a result, inserting a manual line break turns on the Wrap Text option automatically. However, the line breaks entered manually will stick in place when the column is made wider.
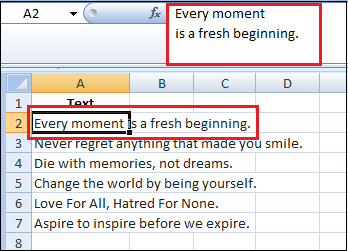
If you turn off text wrapping, the data displays in one line in a cell, but the inserted line breaks are visible in the formula bar.
Excel Wrap Text not Working
As one of the most often used features in Excel, Warp Text was designed as simple as possible, and you will not have any problems using it in your worksheets. But sometimes, the two text wrap functions described above don’t work properly. This often happens when you’re working with third-party Excel documents.
Problems with the feature are always caused by existing formatting that prevents you from optimizing how lengthy cell contents are displayed. In many cases, the text wrap feature doesn’t work as expected because of the Merge cells function or if you’ve set a specific value for the maximum row height.
If text wrapping does not work as expected, then you should check out the following troubleshooting tips, such as:
1. Fixed Row Height
In many cases, Excel may appear to wrap text in a cell properly, but it still doesn’t show the cell’s full text because the author of the document has set the row to a specific height, which causes Excel to hide some of the content despite the text wrap.
If not all wrapped text is visible in a cell, most likely, the row is set to a certain height. To fix this problem, follow the following steps:
Step 1: Select the problematic cell and go to the Home tab.
Step 2: In the Cells group, click on the Format button.
Step 3: Select AutoFit Row Height option.
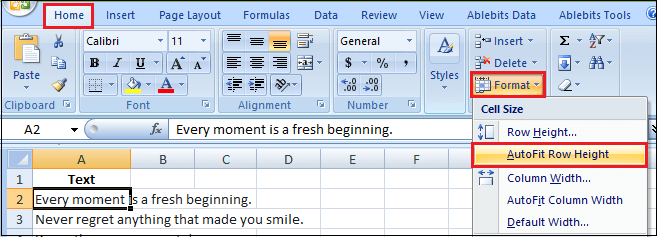
Or, you can set a specific row height by clicking AutoFit Row Height and then typing the desired number in the Row height box. A fixed row height comes in especially handy to control the way the table headers are displayed.
2. Merged Cells
You can’t wrap text in cells that have been merged in Excel. If a manual or automatic wrapping doesn’t work in Excel, it may be because the selected cell is a merged cell. If you want to wrap text in this cell in Excel, you must first unmerge the cells.
If you keep the merged cells, you can display the full text by making the columns wider. And if you want to unmerge a merged cell, then follow the following steps:
Step 1: Go to the Home tab.
Step 2: Select the merged cell by clicking it.
Step 3: Click on the drop-down arrow next to Merge & Center button in the Alignment group.
Step 4: And then click on the Unmerge Cells option from the drop-down list.
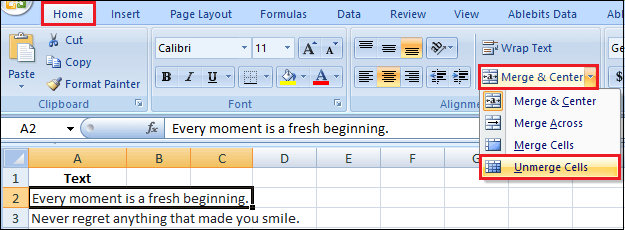
Alternatively, if you right-clicked to select the merged cells, then click on the Format cells and uncheck the Merge Cells checkbox. Click on the Ok button.
