

Adjust Margins in Excel
MS Excel or Microsoft Excel is currently the most powerful spreadsheet software with various features and tools. It can easily handle large amounts of data sets digitally and enables users to print desired data on paper. When printing Excel documents on paper, margins play an important role in adjusting the overall appearance of the printing area. Margins usually help us better to align the worksheet content on the printed paper.

In this article, we are discussing a step-by-step tutorial on adjusting margin in Excel. Before we understand the steps, let us first discuss the brief introduction of margin and how many margin types or options are available in MS Excel.
What is Margin in Excel?
Margins can be defined as the empty spaces between the contents of an Excel sheet and the top, bottom, left, and right edges of a printed page. Top and bottom margins help users display different things like headers, footers, and page numbers, while other margins help better align worksheet data on the printed page.
Excel enables users to manually adjust margins to add more or less blank space around worksheet data. When we set margins too high, the worksheet contents may go to extra pages while printing it. Also, when we set the margin too low, the worksheet data may not look good or appear exquisite on the printed paper. Therefore, we should adjust the margin in excel properly to make it look great and check our printing document in preview before finalizing it for printing.
Note: All the pages of an Excel sheet printed using MS Excel at once will follow the same margin. We cannot specify margins separately for each page when all the pages are printed together. However, we can print sheet pages one by one and adjust margins separately. Similarly, we can also adjust margins differently for pages in different sheets.
What are the margin options available in Excel?
Unlike Word, Excel has only two sets of built-in margin styles in addition to the default or normal style. Thus, we can select these existing margins with just a few clicks. Before we move on to the process of adjusting the margin, let us learn about the margin options available in Excel. They are as follows:
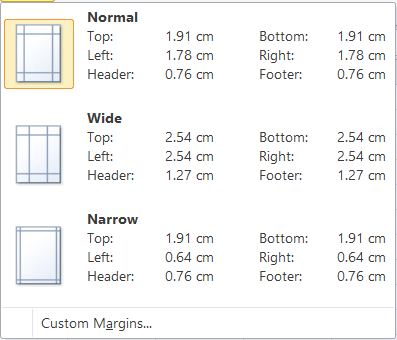
Normal: The normal margin setup is the default margin that Excel follows for each Excel sheet and its pages. It uses the standard top, bottom, left, and right margins of 3/4 inch, where 1/4 inch separates the header and footer from the top and bottom margins, respectively. Despite the default margin, Excel allows us to choose from two other margin settings, namely Wide and Narrow.
Wide: The Wide margin settings that Excel applies to selected sheet uses the standard top, bottom, left, and right margins of 1- inch, where 1/2 inch separates the header and footer from the top and bottom margins, respectively.
Narrow: The Narrow margin settings that Excel applies to the selected sheet uses the standard top and bottom margins of 3/4 inch, left and right margins of 1/4 inch, where 0.3 inch separates the header and footer from the top and bottom margins, respectively.
Custom: We can use our custom margins if we don’t like the default margins and other built-in sets of margins. Using Custom Margins in Excel, we can specify desired margins for headers and footers and center the content of our sheets vertically and horizontally. Custom margin adjustments help us to improve the appearance of the worksheet to our liking.
Tip: When we want to print the contents of an Excel document on a full page, covering the maximum space on the page, we should use Narrow margins. Alternatively, we can use custom margins and reduce the margins to our liking and achieve the maximum possible number of rows and columns on a printed page.
Adjusting Margins in Excel
Excel has many built-in features, and we can access most of the features using different methods. Similarly, we can adjust margins in Excel by using the following two methods:
Method 1: Using the File Menu (or tab)
The simple method to adjust margins in an Excel document is to use File Menu commands. Specifically, we need to follow the steps given below:
- First, we need to select the specific sheet to adjust margins.
- Next, we need to go to the File tab and click the Print option from the list.
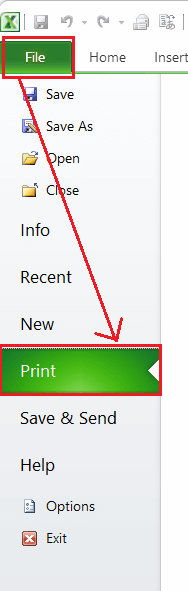

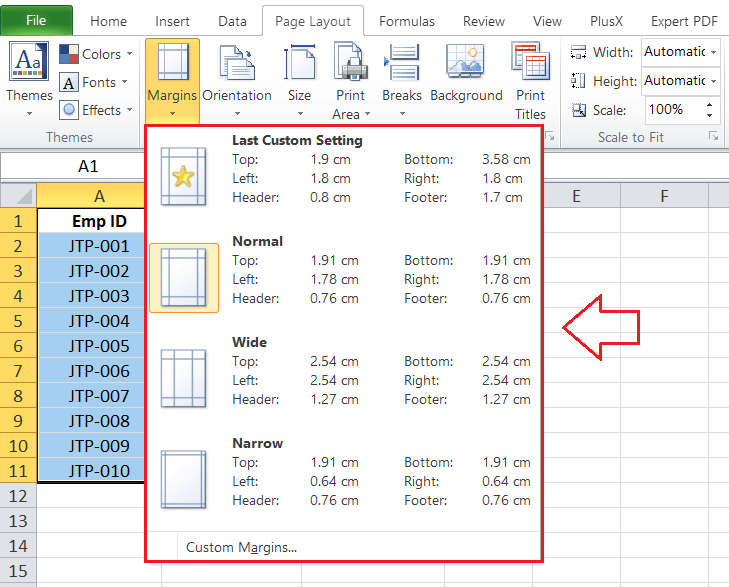
- Excel displays various printing options in the next window, such as choosing the number of copies to the print, default printer, page orientation, scaling, margins, etc. We have to click on the Margins option to access available margins in Excel.
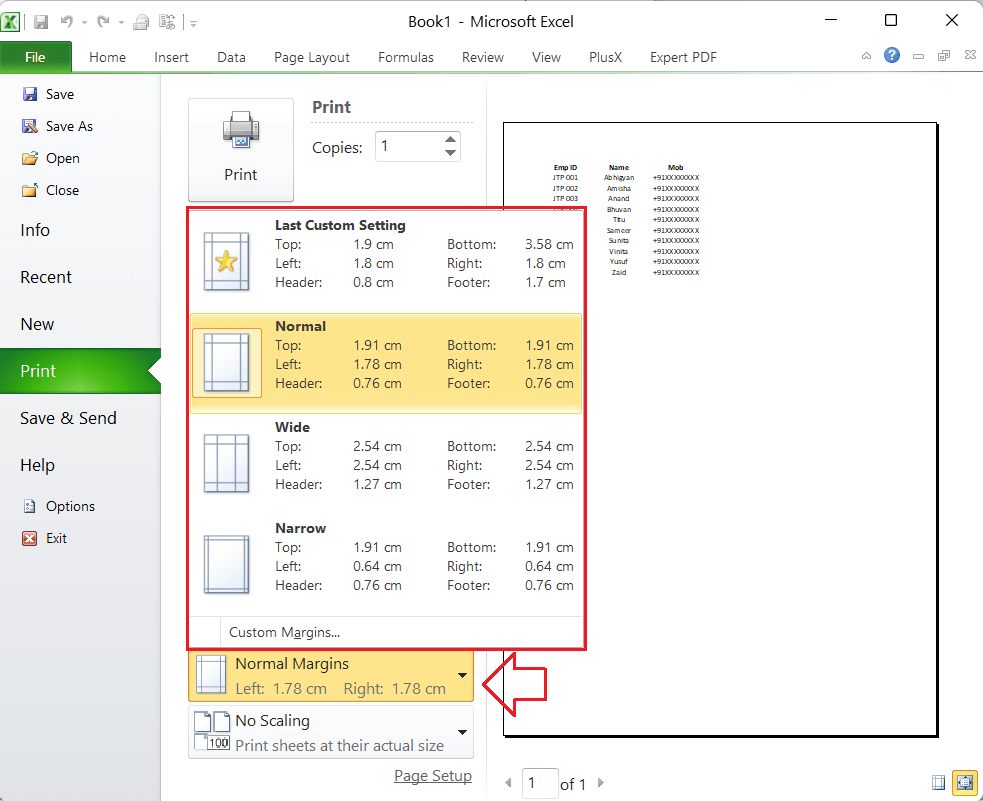
In the above image, we can see three predefined margins as discussed above, i.e., Normal, Wide, and Narrow. We can click on the desired margin, which will be instantly applied to the current sheet or printing area.
In addition to this, we can also choose ‘Custom Margins’ from the list to launch a custom margin dialogue box and adjust margins accordingly.
Method 2: Using the Page Layout tab
Another common method to access features to adjust Excel margins is to use the Page Layout tab on the ribbon. We can perform the following steps to set margins using the Page Layout tab:
- First, we need to select the specific sheet to which we wish to adjust margins. We can select a single sheet or multiple sheets simultaneously as per our needs. Likewise, we can select multiple adjacent or non-adjacent sheets holding down the Ctrl
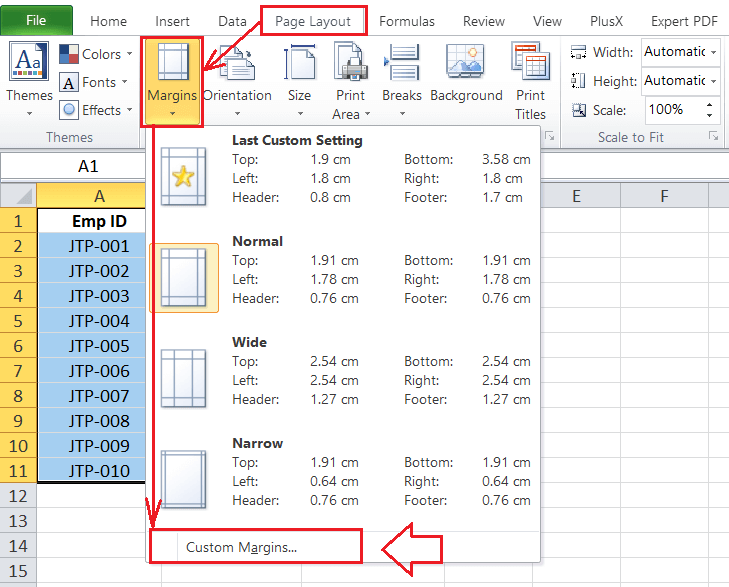
- Once all the desired sheets are selected to apply specific margins, we need to go to the Page Layout tab and click the Margins tool under the Page Setup
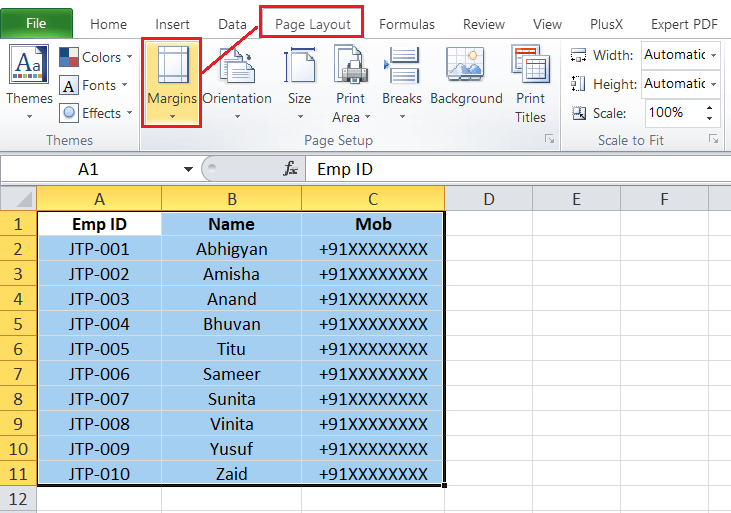
- In the next window, Excel displays all the existing margin options. We can click on any predefined margins, such as Normal, Wide, or Narrow. The selected margin will be immediately applied for all the selected sheets within the active workbook.
In the above image, we can select the ‘Custom Margins’ to set margin size as per our liking.
Steps to use Custom Margins in Excel
As discussed above, Custom Margins enables users to adjust margins as per their preference. This option potentially expands the customization options for margin. We can enter the desired margin in the box provided for each side and a separate area for the header and footer using a custom margin. Additionally, we can center the pages vertically and horizontally as we wish.
We can use any of the following methods to adjust custom margins in Excel:
Method 1: Using the Page Setup Dialogue Box
We need to perform the following steps to adjust margins using the Page Setup dialogue box:
- First, we need to select the sheet to apply custom margins.
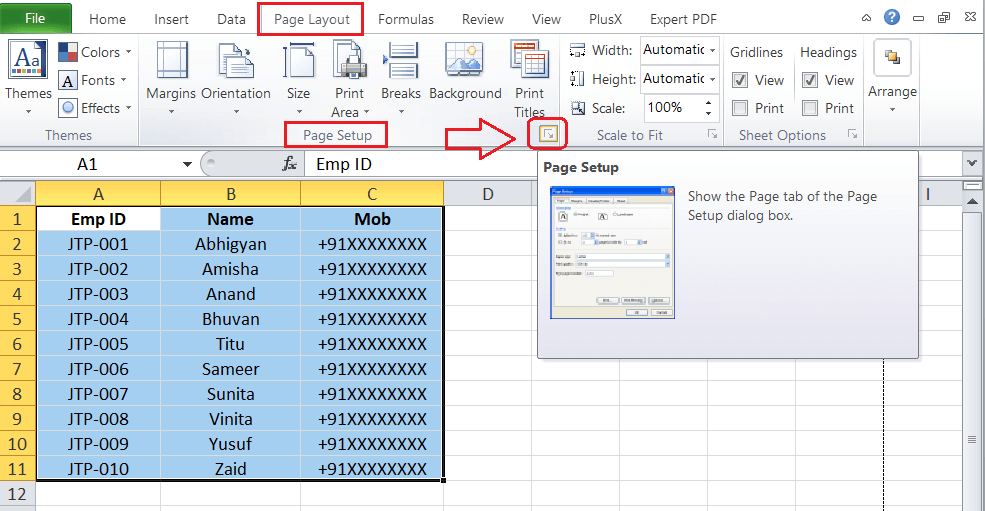
- Next, we need to go to the Page Layout tab and click the drop-down icon associated with the Margin command in the Page Setup group.
- In the next window, we must click the ‘Custom Margins‘ option.
We can also click on the More button (arrow icon) from the bottom right corner of the section Page Setup.
After that, we can select the ‘Margins‘ tab. - We need to enter desired margins in the Left, Right, Top, and Bottom boxes from the Margins tab in the Page Setup dialogue box. Also, we can click on up and down arrows (spin buttons) given next to the boxes for changing the margins in small values.
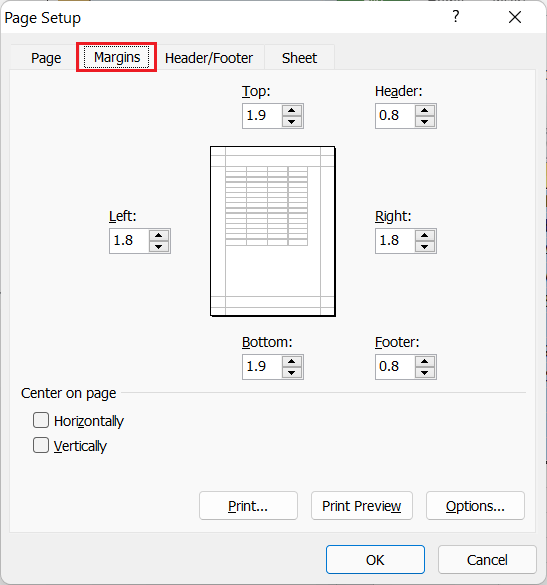
At the bottom of the Page Setup window, we can select the checkboxes under the ‘Center on Page option‘ and align data to a center position between the applied margin settings, vertically and horizontally. - Lastly, we can click the Print Preview button in the Page Setup dialogue box to ensure that margins are set correctly. Once all the margin preferences are configured accordingly, we must click the OK button to apply the settings.
Method 2: Using the Print Preview Tool (File Tab)
Using the margin tool from the Print Preview screen enables us to adjust margins of the active Excel document in a freestyle. This means that we can drag the margins using the mouse and drop them anywhere to apply the margin settings. In this way, we can quickly and effectively adjust margins in Excel.
We need to perform the following steps to adjust margins using the Print Preview Tool:
- First, we need to select the specific sheet to which we will apply desired custom margins.
- Next, we need to go to File > Print.

- In the next window, Excel displays a Print Preview of the active document. We must click the ‘Show Margins‘ icon or tool from the bottom right corner of the Print Preview, as shown below:
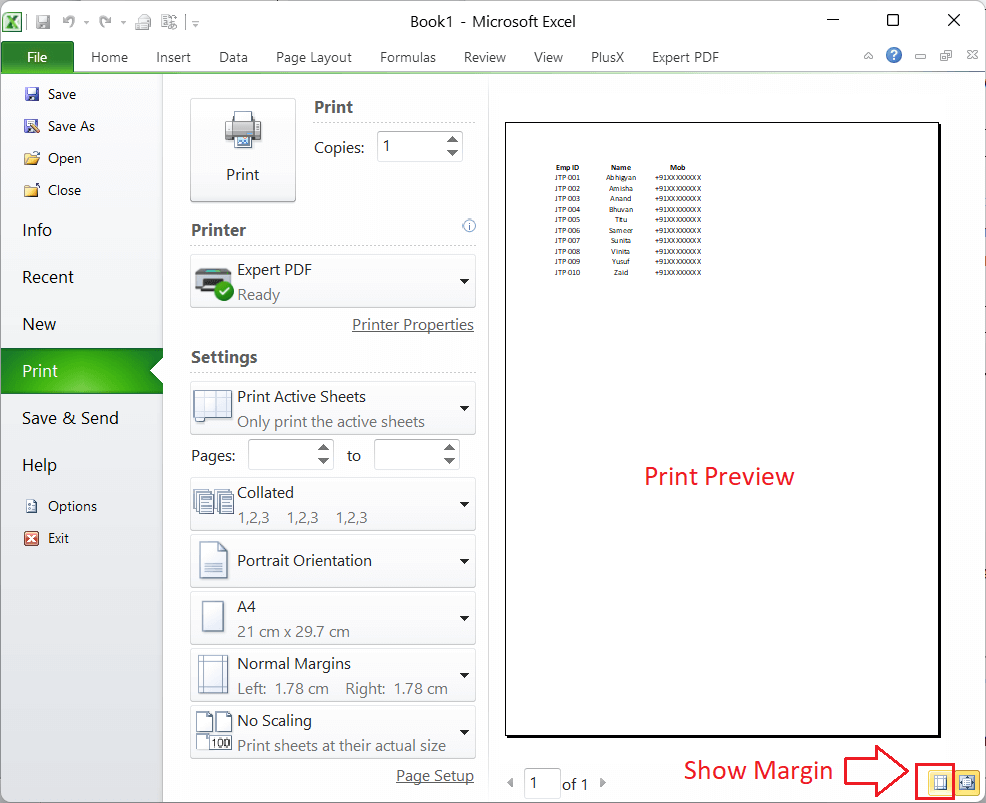
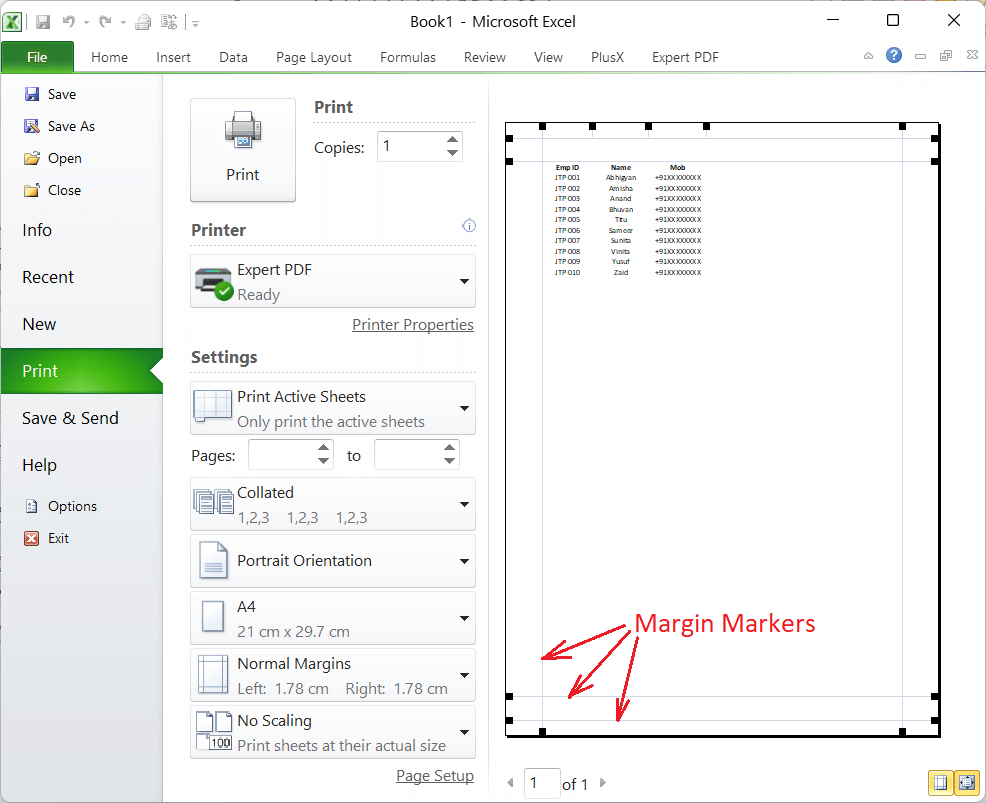
- After clicking the ‘Show Margins’ button, Excel displays margin markers. We can click, hold and drag the margin marker of any side using the mouse button and release the mouse button to redraw new margin settings. Additionally, we can also adjust the column width using the same method.
After adjusting the margins in the Print Preview panel, we can click the Print button to get the document printed on paper with the applied margins.
Important Points to Remember
- It is important to note that Excel for the web does not offer the feature to adjust page margins. However, it has some Page Setup options under the Page Layout tab. We can download the specific Excel file from Excel for the web, open it in Excel for Desktop and adjust margins as per our choice.
- Excel enables us to adjust margins for multiple worksheets simultaneously.
- If we have previously used custom margins in Excel, the same settings will be displayed under Margins drop-down list as the Last Custom Setting
- It is recommended to keep the header and footer settings smaller than the top and bottom margin settings and greater than or equal to the used minimum printer margin.
When we adjust margins in Excel for any specific worksheet, the margins settings are stored in that sheet only, and it does not change the default margins in other sheets or for new workbooks.


