

Excel automation
If you are looking for automation in Excel, probably you have worked a lot with Excel. You know that manually entering the data in an Excel sheet is a very tough task to do when you have huge data. At that point, you need to do automation.
By taking the help of this Excel automation chapter, you will learn the automation process in an Excel sheet and see how can you automate the task. Automation can be done in various ways in MS Excel and its benefits are also incredible. In this chapter, we will discuss automation efficiency and how it makes the users work easier.
Many organizations use MS Excel application for storing, organizing, and analyzing purposes in their daily life. But they are not aware of the Excel automation feature. Automation is a bit complicated but makes the work easy for the users for implemented successfully. Automation provides a convenient process and saves time.
What is used for automation?
Excel automation is a tool of Excel that saves the time of users when updating documents. Macro is used to automate the task in Excel. Excel users need to create macros for this purpose. A macro can perform several operations by recording the task. This can be used to update the data of the Excel document.
Just like the VBA code, macro resides within the MS Excel application. It has the ability to manipulate the data in the Excel sheet in which it resides. Besides this, the macro can also be used to:
- Manipulate the data of Excel sheet
- Create a new document
- Apply formatting and style to data
- Communicate between different types of data
Several automation tools are there in Excel application that can be used to automate the work within the Excel sheet.
What type of operations can automate in Excel?
Some parts of MS Excel are already automated in Excel application through the formulas. For example, creating dynamic reports based on the Excel sheet data. With the help of Excel automation, you can automate the following manual work such as –
- Database Integration
- Application Integration
- Cleaning and parsing data
- Migrate and extract the data
- Running analysis report
The automation can be implemented using RPA (Robotics Process Automation). Macros are also is another way to automate the tasks in Excel.
When to automate the task?
The Excel users can automate the task which you require to perform repeatedly. Rather than performing the same task manually again and again, we will repeat a macro for it and execute it to automate the process.
For example, you have dates stored in an Excel sheet having different formats. You want to provide the same format for all dates. You can understand that it is a repetitive task. So, we will create and record and macro for it. A macro can make our work easy.
Where is a macro?
Macro is one of the best tools to automate the process and perform repetitive tasks. The Excel users can create and record a macro for their purpose. Macro option and VBA tool both are available inside the Developer tab where from you can record macro.
Record a macro
There are a few things that a user should know about the macro before recording and performing operations with it.
- The recorded macro runs only on the cells within the range of cells for which you have created the macro. In case you have added more data to the sheet after recording the macro, the recorded macro will not run for that data.
- Rather than creating a long macro, Excel users should prefer to create a small macro.
- It is not necessary to record the task of only Excel application. A macro in MS Excel can also extend the other applications or the applications that support VBA (Visual Basic Application).
Now, follow the steps to record a macro in Microsoft Excel.
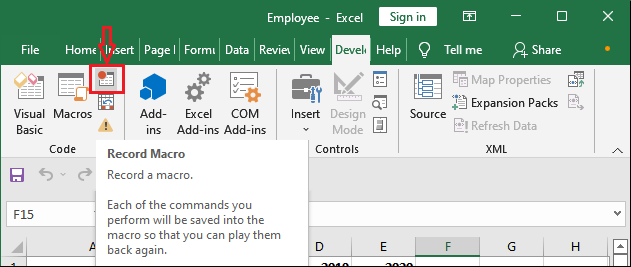
Step 1: On your targeted Excel sheet for which you want to record a macro to automate the task, go to the Developer tab.

Step 2: Inside the Code group section, click the Record Macro option. Or you can also press the Alt+T+M+R shortcut key to directly open the record macro window.
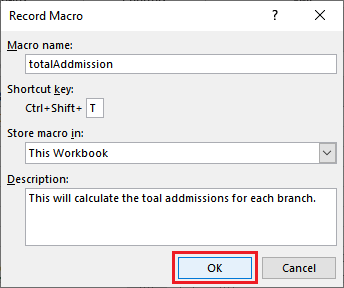
Step 3: Fill the following data in the given field –
- Enter a macro name inside the Macro Name field. The name should be a description in itself.
- Assign a shortcut key to run the macro so that you do not need to run the macro by taking long steps each time.
- Select a place inside the Store Macro In field where you want to store your macro.
- Provide a description about the recorded macro in the Description field if you want and then click OK.
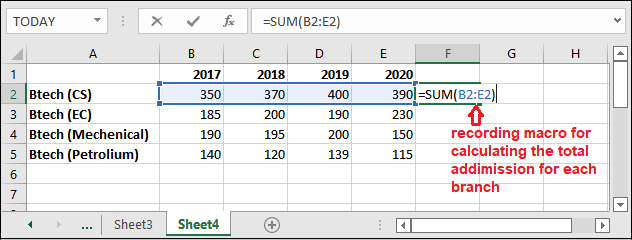
Step 4: Once you click OK after providing the information, you can start recording the macro. So, perform the steps you want to record for macro.
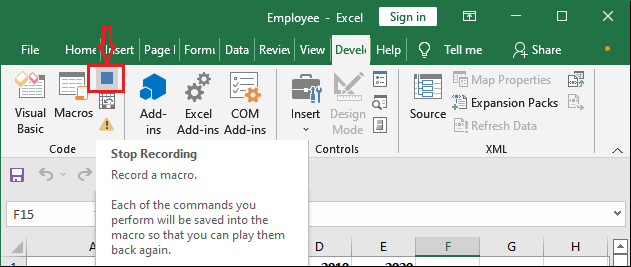
Step 5: After successful recording, you can stop recording the macro from the Developer tab. Developer tab > Code group section > click Stop Recording.
Working with recorded macro
Inside the Developer tab, click the Macros to view all the macros associated with the currently opened workbook. You can also press Alt+F8 to open the Macro dialogue box having a list of macros.
There are several ways to run a recorded macro. You can run it from the Excel menu bar or use the shortcut key that you have defined while creating the macro.
Run recorded macro from Excel menu bar
When you have multiple macros recorded in an Excel sheet and have shortcut keys for them to run. It is not possible to remember all the shortcut keys. So, you can run it from the Excel menu bar, where you will find all the macros recorded for that sheet. Hence, you can select your targeted macro and run the macro.
Step 1: In the Developer tab, click the Macro button to see all the recorded macro for the sheet.
Step 2: When you will try to run the recorded from the Excel menu bar, you will see a list of all macros. From here, select the targeted macro and run it by clicking the Run button.
Step 3: The recorded macro will start running.


