How to enable the developer tab in excel
Microsoft Excel is one of the essential Office software or program that enables finance users to record vast amounts of data within cells across various worksheets. It helps performs various operations on the recorded data, allowing us to create reports, compare different data sets, analyze large volumes of data, implement arithmetic and logic operations, draw charts, etc. Furthermore, the software also offers various advanced functions such as Macros, VBA, Add-ons, and more. Most of such features are accessed via the Developer tab on the ribbon.
In the tutorial, we discuss the step-by-step procedure on how to enable the developer tab in Excel. Here, we use the term ‘enable’ because the Developer tab is an existing feature of Excel and has been available in every version of Excel from 2007 to 2019 or above.
What is the developer tab in Excel?
Like other typical tabs on Excel’s ribbon, the Developer tab is one special tab that offers quick access to some of Excel’s advanced existing features and functions. Although it is handy for some users, the tab is not visible in Excel by default. Instead, the user must enable or activate the Developer tab using the Excel Settings or Options.

The process of enabling the Developer tab is quick, easy to use, and one-time-process. Once the Developer tab is activated in Excel, it becomes available to use every time we open or launch the Excel program. However, if we reinstall the Office suite on the machine, we must follow the procedure again to enable the Developer tab.
How to enable the Developer Tab in Excel?
Enabling the Developer tab in Excel is just a few steps process, and the process is the same in all the Excel versions. We must follow the below steps to activate or enable the Developer Tab in Excel:
- First, we need to launch the Excel program and open a blank worksheet window. Once the Excel worksheet window is displayed, we can access all the default tabs on Excel’s ribbon.

- Next, we need to go to the File tab and click on the ‘Options’ button to open the Excel Options window. This window allows us to adjust all the core settings in our Excel software.

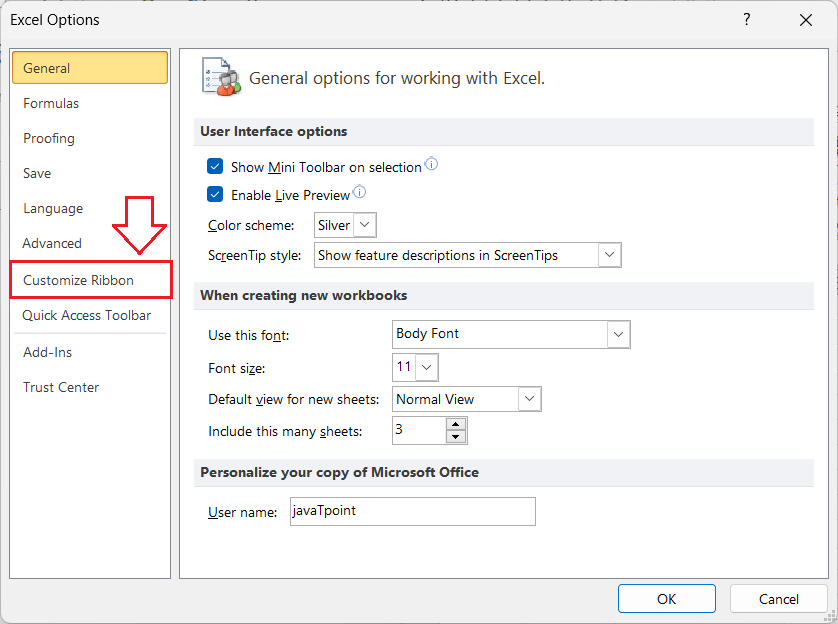
- In the Excel Options window, we must click on the ‘Customize Ribbon’ option from the left-most list or category.

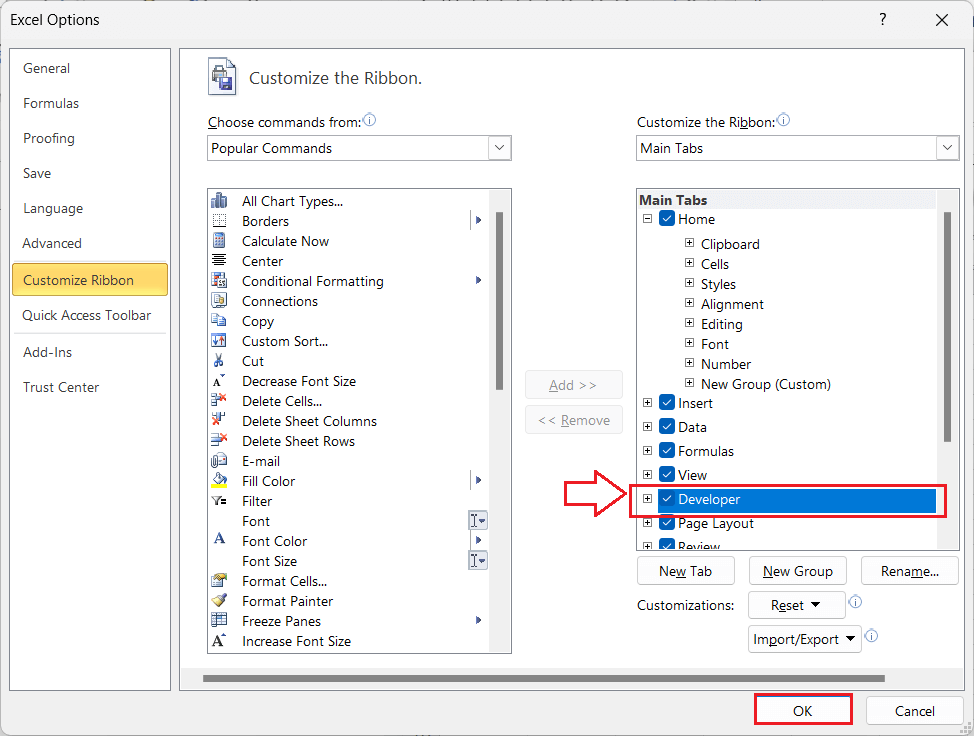
This will list all the available tabs of Excel in the right-most side list. We need to locate the Developer tab option in the list under the ‘Main Tabs’ section and select or tick the box associated with the ‘Developer’ option.

- Lastly, we must click the OK button to apply the changes, and the Developer tab will be immediately visible on the Excel ribbon. After that, we will see a Developer tab every time we launch a new Excel window.

The alternate method to enable the Developer Tab
There is another easy method to make the Developer tab appear on the Excel ribbon, and this method also works on all versions of Excel. Below are the steps for an alternate method to get the Excel developer tab in the ribbon:
- First, we need to launch the Excel program and open a blank worksheet window. Once the Excel worksheet window is displayed, we must press the right-click button via the mouse on any existing tabs on the ribbon. Next, we must click the ‘Customize the Ribbon’ option in the list to open the ‘Excel Options’ window.

Once the ‘Excel Options’ window is displayed, we should follow the remaining steps as similar as discussed in the previous method and get the Excel Developer tab on the ribbon.
Changing the Position of the enabled Developer Tab
As soon as we enable or activate the Developer tab in Excel, it immediately appears after the View tab or, at last, on the ribbon. However, we can reposition or move it as per our liking. We can perform the below steps to change the position of the Developer tab in Excel:
- First, we need to open the Excel Options window and navigate the Customize Ribbon option, either from ‘File > Options > Customize Ribbon’ or from the ‘Right-click on any existing tab > Customize the Ribbon’.
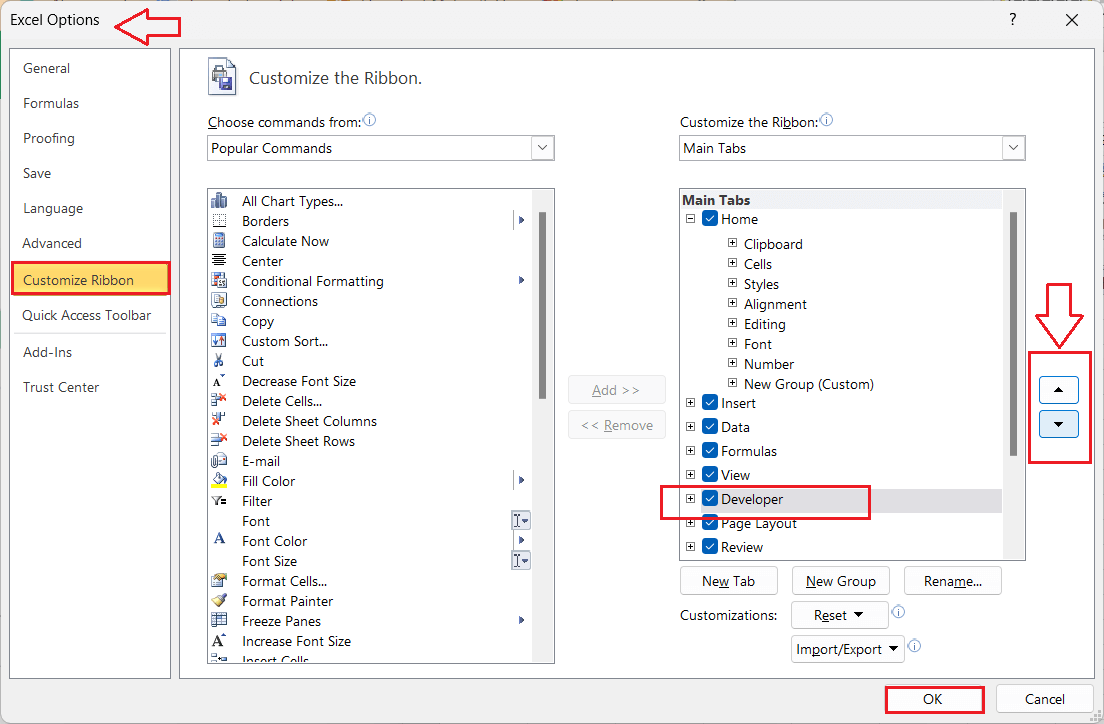
- In the Customize Ribbon section, we must select the Developer option under the Main Tabs and use upward/ downward arrow shortcuts from the right side to change the position in the list. Each click on the upward arrow moves the Developer tab one position to the left, while each click on the down arrow moves the Developer tab one position to the right on the ribbon.
- After the position of the Developer tab is adequately arranged, we must click the OK button to apply the changes.

Removing the Developer Tab from the Ribbon
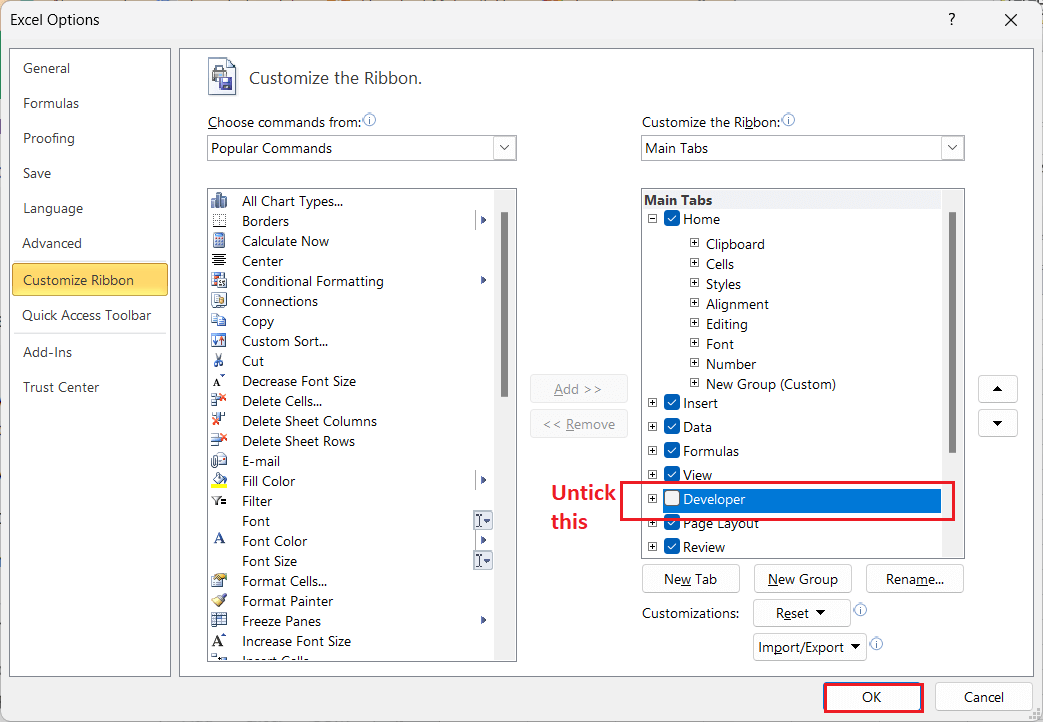
Removing or hiding the Developer tab is almost the same as enabling it on the ribbon. We must follow all the steps like the above-discussed methods until we see an Excel Options window. Then, under the Customize Ribbon option, we must uncheck or clear the checkbox associated with the Developer box and click the OK button. This will immediately remove the Developer tab on the Excel ribbon.

At the next start of the Excel program, the Developer tab will remain invisible until we select its checkbox again.
Essential Features in the Developer Tab
After enabling the Developer tab on the ribbon, some of the essential features we’ll find there include the following:
Visual Basic for Applications (VBA)
VBA is one of the essential features present inside the Developer tab. Clicking on this tool launches the VBA editor. The editor window allows users to write specific codes to perform specific operations in Excel. Almost every task we perform through the existing Excel tools can be performed via VBA, even the more advanced tasks. VBA codes are helpful for repeated tasks as we can save them and execute them in the future when needed. We can also access the VBA editor using the ‘Alt + F11’ keyboard shortcut.
Macros
The Macros option is another essential feature under the Developer tab and works almost like the VBA. However, unlike writing codes in the editor, we have to record the entire process in Excel. When we record a Macro, a set of performed actions is stored in the form of codes. We can run/ execute the recorded Macro to perform the corresponding actions repeatedly to carry out the associated task. Furthermore, we can also edit and manage the already recorded Macro. The Windows keyboard shortcut to launch a Macro is ‘Alt + F8’.
Add-Ins
Add-ins are additional programs designed to work with Excel. These programs are installed like other typical computer programs but are used via Excel. However, we must first activate the add-ins after installing them to make them accessible in Excel. Using the add-ins helps us extend the functionalities of Excel because they (add-ins) contain additional features and commands.
There is a wide range of add-ins available for Excel. Some add-ins are created using software/programs like Analysis Toolpak and Solver, while certain solution providers develop unique add-ins to perform specific operations. Users with little programming knowledge can also create the add-in to perform the desired task. It enables users to write or record the process codes in a module and save them accordingly as an Excel add-in. Moreover, we can add the add-in to the Quick Access Toolbar (QAT) to quickly use it whenever needed.
Interactive Controls
In Excel, we typically have access to two different types of controls mainly used on sheet forms. The two controls are called Form Controls and ActiveX Controls. Form Controls are comparatively easier to use as compared to ActiveX Controls. However, ActiveX Controls offers users a more flexible user interface, making it easier to interact with VBA.
With the interactive controls in the Developer tab, users get access to implement various interactive tools-for example, checkboxes, radio buttons, combo boxes, etc. Moreover, Excel allows users to add the desired controls within the sheets, edit the corresponding VBA codes, and toggle between on/ off switches to turn on and off design modes accordingly.
XML Commands
The XML Source Task Panel is another essential feature available under the Developer tab. It mainly enables us to import/ export the desired XML data written using different applications and/ or databases. Moreover, we can manage XML maps, control included expansion packs, and arrange XML data files using the XML Source task pane.


