How to insert bullet points in Word document
Bullet point is a symbol that is used to introduce separate items present in a vertical list, sentences, or paragraphs. It is also used to write important information within a document.
The advantage of bullet points is that it allows readers to quickly read and understand the important part of the document, important heading, and more.
A bullet point contains a variety of symbols, including black dots, open circles, rectangles, squares, diamonds, dashes, checkmarks, asterisk, arrows, and more.
Example:
A list of fruit containing black dot bullet points –
- Mango
- Apple
- Grapes
- Papaya
There are the following methods to insert bullet points in Word document –
Method 1: Using the Home Tab
Follow the below mentioned easiest and quickest steps to insert bullet points –
Step 1: Open the new or an existing Word document.
Step 2: Highlight or select the list of items in which you want to insert bullet points.

Note: If the list is not created earlier, then first create a list of items.
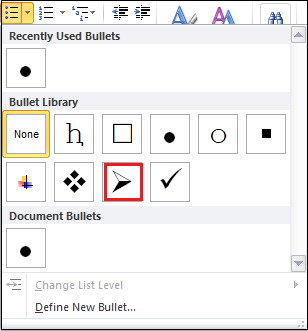
Step 3: Go to the Home tab on the Ribbon and click on the Bullets drop-down icon associated with the Bullets in the Paragraph section.

Note: To insert numbering, click on the numbering drop-down icon next to the Bullets icon.
Step 4: A list of Recently Used Bullets dialog box will appear on the screen. Select the bullet point that you want to insert in the Bullet Library.

The screenshot below shows that bullet points are inserted to the Word document –

Method 2: Using the Symbol tab
You can also insert bullet points using the Symbol tabs. The Symbol tab contains the various option of bullet points.
Follow the below steps to insert bullet points –
Step 1: Open the new or an existing Word document.
Step 2: Place cursor in the document where you want to insert a bullet point.
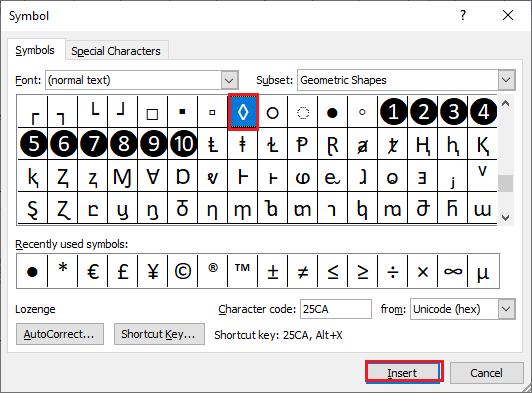
Step 3: Go to the Insert tab on the Ribbon and click on the drop-down menu associated with the Symbols icon in the Symbols section. Click on the More Symbols.

Step 4: A list of the symbols dialog box will appear on the screen. Select a symbol according to your requirement and click on the Insert button at the bottom of the screen.

Now, you can see that Symbol (bullet point) is inserted into the selected place.
Note: Once you insert the symbol in the document, you can use the same symbol from the Home Tab. To access the inserted symbol, go to the Home tab and click on the Bullets drop-down icon in the Paragraph section.
Method 3: Using Keyboard Shortcut Keys
This is the simplest method to insert bullet points using the MS-Word keyboard shortcut keys –
Follow the below instructions to insert bullet point using the keyboard shortcut keys –
- Open the Word document.
- Place the cursor before the text where you want to insert a bullet point.
- Press and hold the Alt key and type Alt code 0149 from the Keyboard.
- Release the Alt key from the Keyboard.
Now, you can see that bullet point (• tutoraspire) is inserted before the text.
Method 4: Create a multi-column bullet list in Word document
Follow the below steps to create a multi-column bullet list in Word document –
Step 1: Open the Word document and type the items on the list.
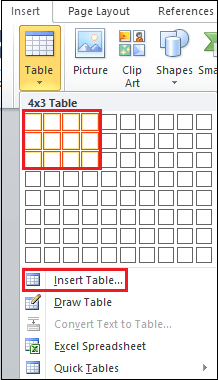
Step 2: Go to the Insert tab on the Ribbon and click on the Table option in the Tables section.

Step 3: An Insert table dialog box will appear on the screen. Select the number of rows and columns, as per your requirement, or you can also click on the Insert Table… option to insert the number of rows and columns manually.

Step 4: Once the Table is inserted to the document, select the table, go to the Home tab, and click on either Bullet or Numbering option in the Paragraph section.

Note: In our case, we are going to use the Numbering option.
Step 5: Now, you can see that numbering is inserted to the table.

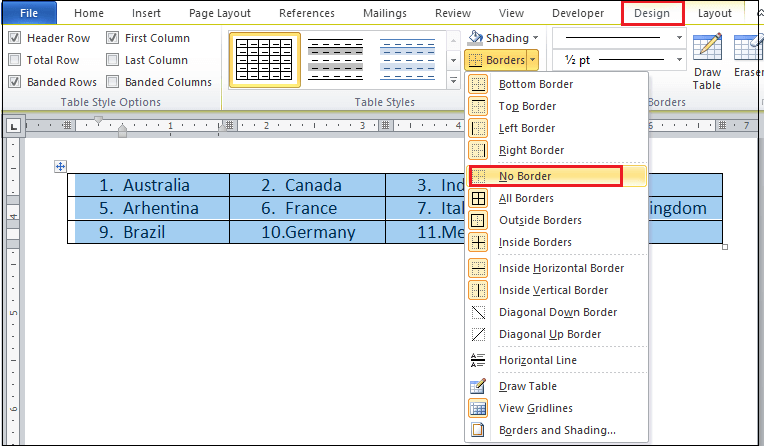
Step 6: If you want to the remove border form the table, then select the table, Go to the Design tab on the Ribbon, and click on the No Broder option from the drop-down menu, as shown in the screenshot below.

Now, you can see that a multi-column bullet list is inserted to the Word document.


