

How to recover an Excel file?
An Excel file is the most commonly used document in offices. You have often faced the problem of data lost in Excel due to the unsaved file or any other reason. You are worried about how you could get your data that has been gone after closing the Excel file. In that case, the only option is to recover the Excel file.
There are various options to keep your data safe, such as backup the file on Excel backup or OneDrive. Sometimes, if you close the file mistakenly without saving it, you can get it back from there.
This chapter will give a complete guide for recovering an Excel file if you close Excel without saving the file. All the methods that we will discuss in this chapter will work on Excel 2010 and above. Besides that, we will also give you a brief overview of how you can take a backup of your Excel files.
Frequently asked questions
Here we have some frequently asked questions that may relate to the above topic.
- Recover an Excel File
- Recover an unsaved Excel file from Excel backup facility
- Recover an unsaved Excel file from OneDrive backup
- Recover an overwritten Excel file from Window File History
How to prevent Excel data loss
Before moving to the recovery methods, we will suggest you need to follow few things while working with Excel. So, your data will not lose. These precautions will prevent you from Excel data loss.
- When you create an Excel file and store your essential data in it. Therefore, first and foremost, save the file so that you can save your data to be lost because of the power cut issue or unsaved file.
- If you are updating something in an existing Excel file, try to save it frequently and early using Ctrl + S shortcut key.
- Take a backup of your file to Excel backup store or OneDrive. So, if you mistakenly deleted any of your files, you can restore them from there.
- Besides that, you can also use the Autosave feature of Excel to save a copy of your file data in every five minutes on your behalf. You can change the auto-saving time.
Methods to recover the Excel document
There are many methods to recover the unsaved Excel document.
Method 1: Recover an unsaved Excel document from Excel itself
Method 2: Recover an Excel file from Excel backup
Method 3: Recover an Excel file from the OneDrive backup
Method 4: Save file early to prevent data loss
Method 5: Use Auto Recovery feature to prevent data loss
Method 1: Recover an unsaved Excel document from Excel itself
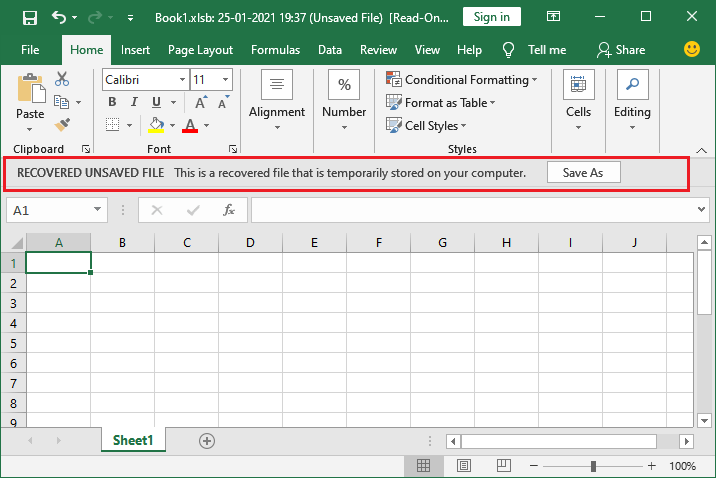
In case you have closed the file without saving the file. This method is the easiest and simple method to recover the recently unsaved file. Accidently deletion or corruption of an Excel file can be a big loss of data, which can waste your time and effort too.
So, use the built-in Excel backup feature to keep a backup copy of your Excel file. In case your Excel file has been missed, you can recover it from the Excel backup facility.
It does contain any complicated steps. Follow the steps to recover an unsaved Excel file:
Step 1: Open your Excel application and go to the File tab in the menu bar.

Note: Remember that we are using Microsoft Excel version 2016 in this tutorial. So, all the methods will work on Excel 2016.
Step 2: Click on Recent to see all the Excel files created or updated recently.
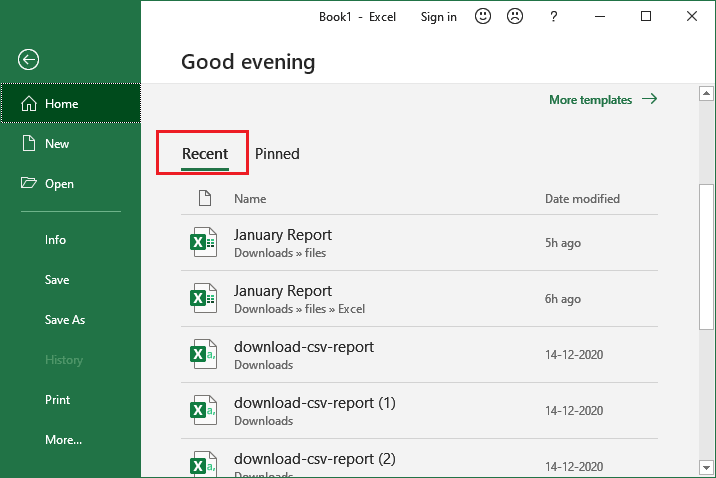
Step 3: Scroll down to the recent Excel documents and then click on the Recover Unsaved Document that will contain the list of unsaved Excel documents.
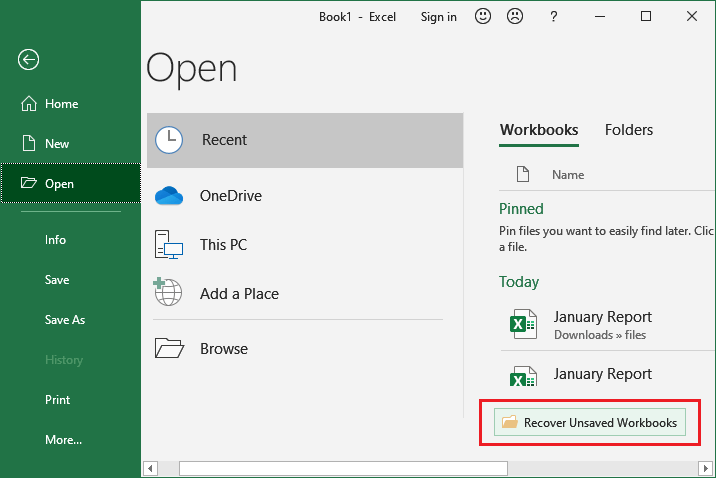
You might not get this Recover Unsaved Workbook option, click on More Workbooks, and then you will definitely get this option.
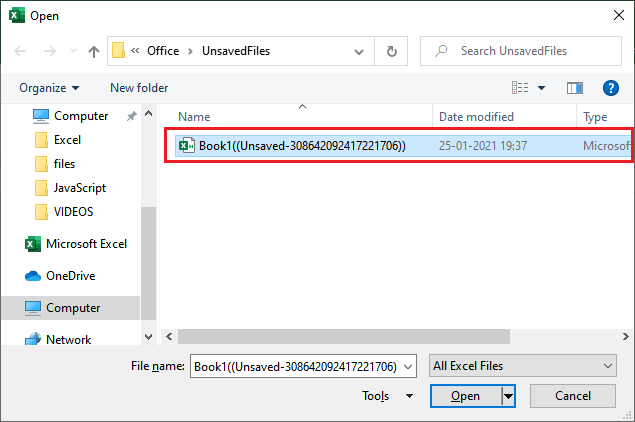
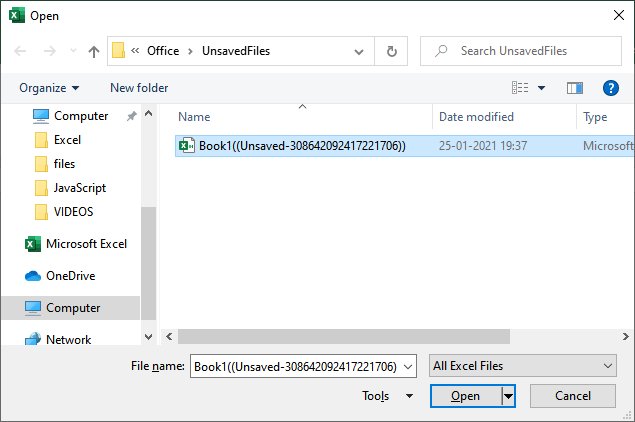
Step 4: Your draft folder will open up to you in a new window containing the unsaved Excel files in it. We have one unsaved document you can see in the below screenshot.
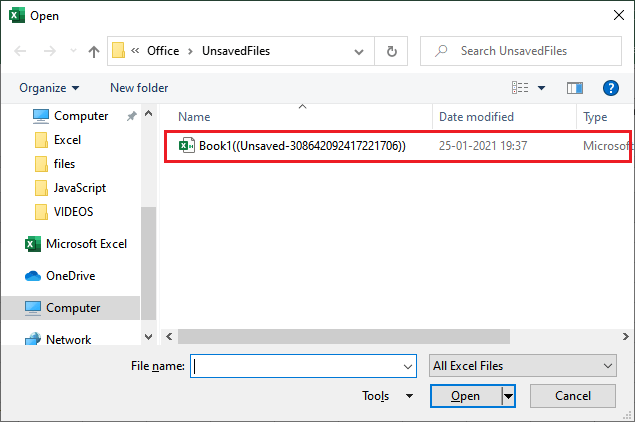
Step 5: Select and open the unsaved file.
Step 6: If your selected file is the correct one that you are looking for, save it in your device from Save as button enabling in the business bar at the top of the file.
You can also get the unsaved file using the below steps. Both the methods will take you to the folder where temporary files are stored, which is not saved by the user permanently in their device.
Check for temporary files
Excel creates a backup for unsaved temporary Excel files. Sometimes, we require these files that we have not saved. These files can be recovered as Excel creates a backup for temporary files. Basically, these files are needed to recover the unsaved changes. It is very easy to get the files. Follow the few steps below and get the file:
Step 1: Open the Excel and navigate to the File menu tab.

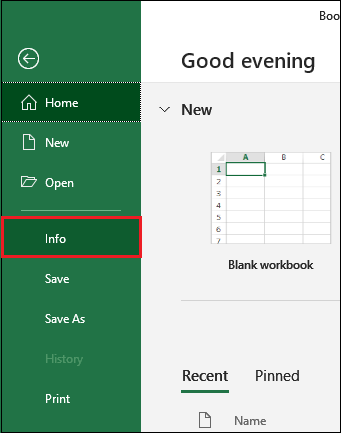
Step 2: Click on the Info button at the left panel of the Excel screen.
Step 3: Go to the Manage Workbook dropdown list and click on it. It will explore two options to choose either to Recover the unsaved workbooks or Delete all unsaved workbooks.
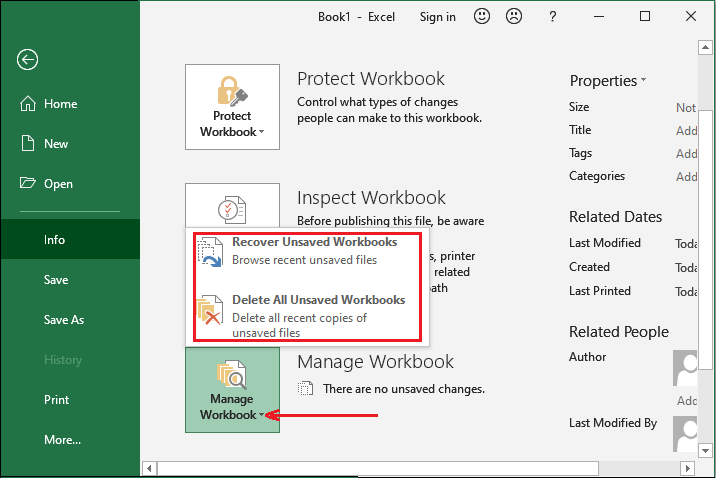
Step 4: Click on the Recover the unsaved workbooks to recover the unsaved temporary Excel file.
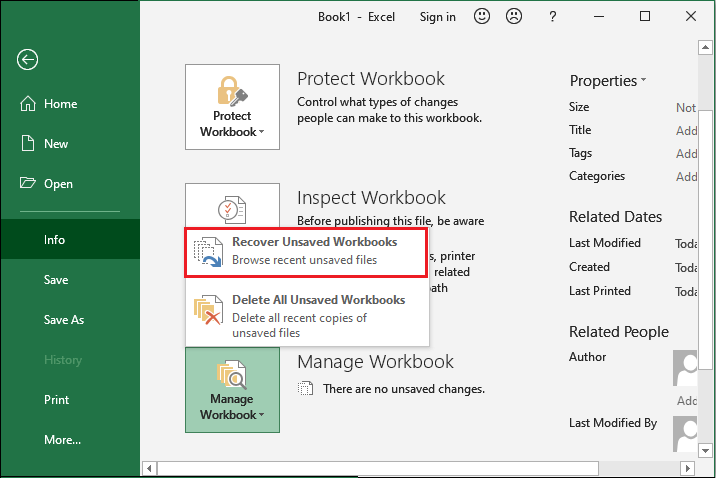
Step 5: It will take you to or open the File Explorer that will contain the list of unsaved Excel files. If you get any file here, select or double click on it to open in Excel. You might get some changes back to your Excel file from here.
Step 6: Other than this, if you go File >> Options >> Save, you will get the location of Auto Recovery files. You can also change the location for the unsaved file from here.
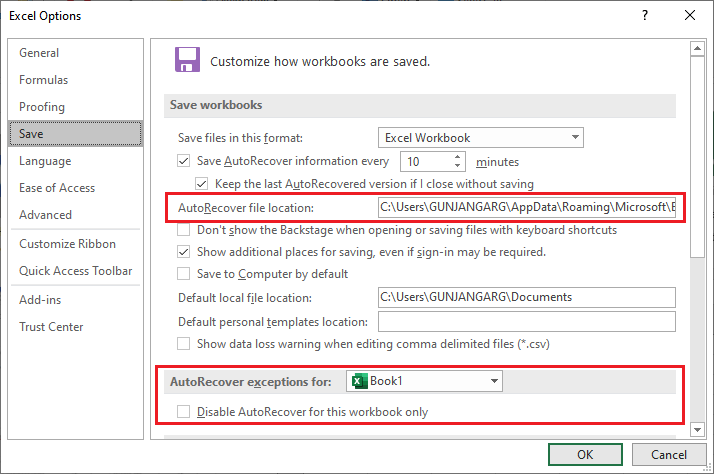
You can check out this folder to see if there is any more useful file here. Or you can disable auto recover for a particular workbook from here as well.
Recovering an Excel file from Excel backup
Accidental deletion or changes in a file can ruin your work. In earlier versions of MS Excel, every time when you save a file, a backup copy of that Excel file was automatically created. The Excel backup feature still exists in newer versions of Excel, but it is hidden. So, you have to make a separate setting for each file to take the backup for that file. Simply, each Excel file requires to setup individual backup settings for backup on cloud.
Note: Excel backup features available in the newer version of Excel, but it is hidden.
This backup file helps the users when any accidental changes are made in file. It allows the user to get the most recent copy of your Excel file. Besides that, you can also download the file from Excel backup in case you accidently deleted your Excel file. If the backup of Excel file is available, you can download it from there.
As we already told you that each Excel file requires a separate backup setting to be established. So, here we have the following steps to setup settings for an Excel backup file:
Step 1: Open the Excel and navigate to the File menu tab.

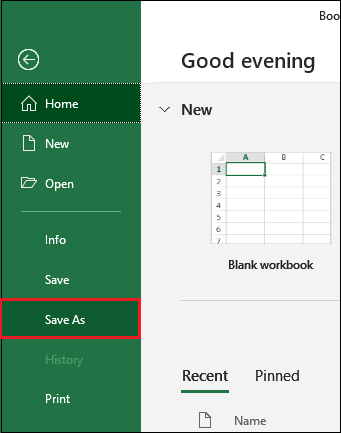
Step 2: Click on the Save as button at the left panel of the Excel screen.
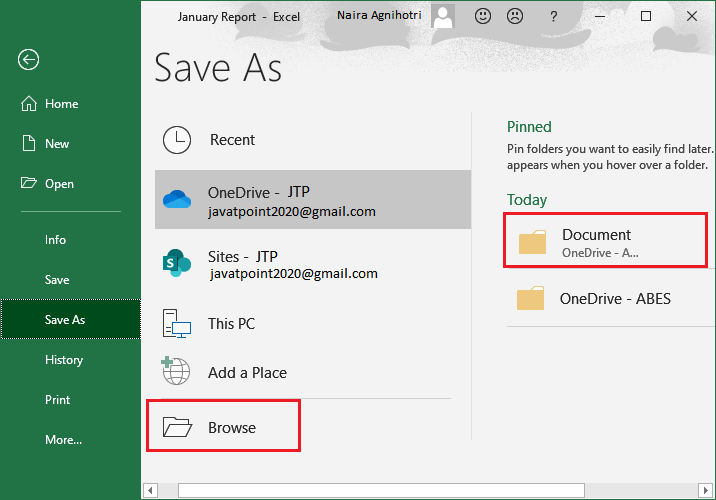
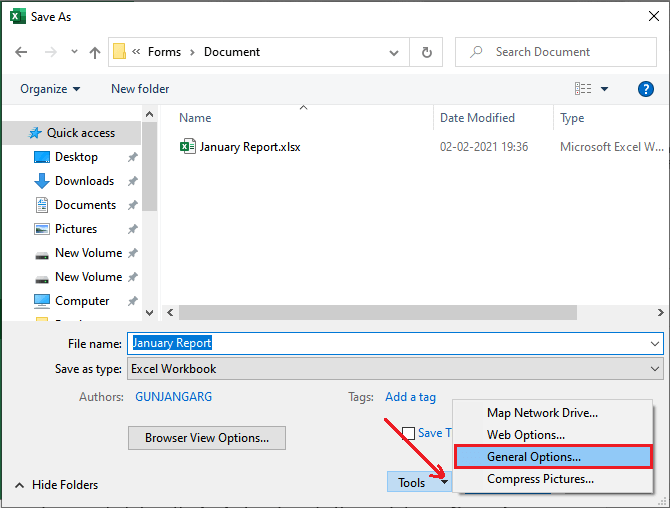
Step 3: Click on the Document folder to directly save the file in this folder or Browse button that will open a window to choose a location to save your Excel file. Choose a folder to save your file.
Step 4: You will be moved to the device folder to save the Excel file. Here, at the bottom of the window panel, click on the tools dropdown button and choose General Options.
Step 5: A popup window will open containing few options. In this popup, Mark the “Always Create Backup” checkbox and click on the OK button below.
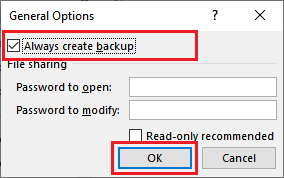
You can also set the password to open and modify the Excel file. It will restrict the users.
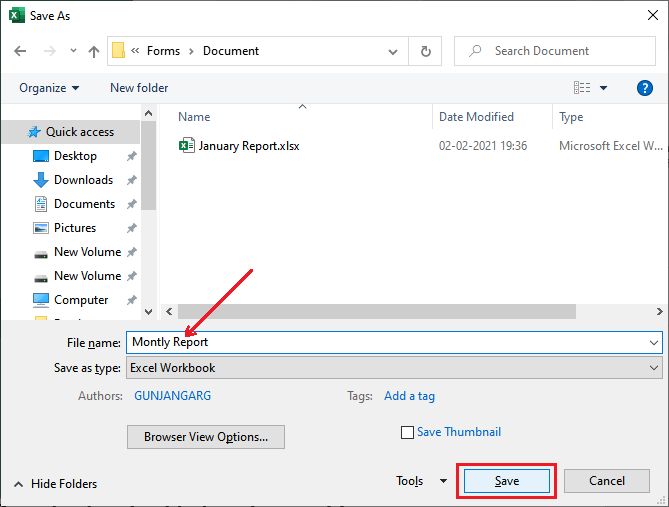
Step 5: Now, save this Excel file by providing a name to it and click on the Save button.
Now, whenever you save a file, Excel will create a backup copy of your file. In case you delete your file from the system mistakenly, you can download the last updated file from the backup.
Use OneDrive backup facility to keep safe your file
Accidental deletion or changes in a file can ruin your work. Losing important data can be a big loss of time and money as well. MS Excel provides OneDrive backup facility to keep a backup of your files and secure your data. Excel allows its users to store their files on OneDrive as a backup copy.
By using the OneDrive backup facility, you will add a one more protection layer from losing the files.
This backup facility enables the users to upload their Excel file on cloud by signup to the Microsoft account with an email id and password. Here, your can store their files. One of the great advantages of using this feature is that one can access its Microsoft account anywhere and get their files available anytime.
This backup helps the users when any accidental changes are made in the file. It allows the user to get and download the most recent copy your Excel file. Besides that, you can also download the file from Excel backup in case you accidently deleted your Excel file.
Recover file when file is already backed up to OneDrive
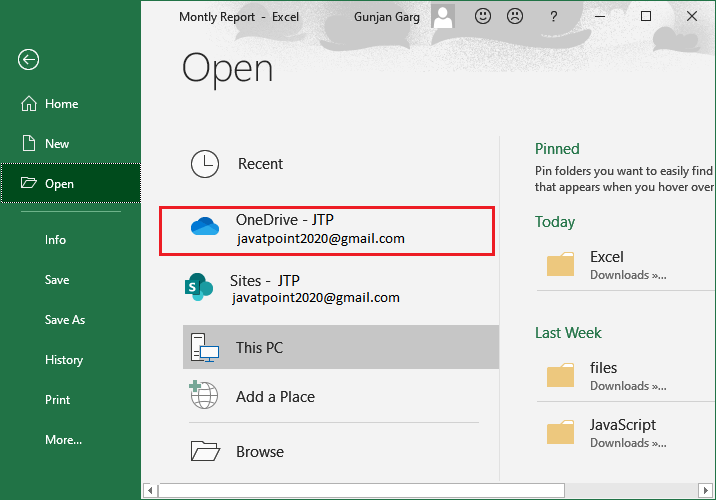
Step 1: Go to File > Open, where you will get a OneDrive option; click on it.
Step 2: Here, you will get an OneDrive folder where your Excel files are backed up.
Step 3: It will take you to the OneDrive backup folder. You will see two files have backed up. Select any of the file and click on the Open button.

Step to set up OneDrive for the first time
Here we have the following steps to set up the OneDrive backup setting from Excel:
Step 1: Open the Excel and create a new Excel spreadsheet or open an existing Excel file (spreadsheet).
Step 2: Navigate to the File menu tab.

Step 3: Go to Save as on the left panel of the Excel to store your file on cloud/OneDrive.

Step 4: Here, click on the OneDrive to upload and store your Excel file on OneDrive cloud storage.
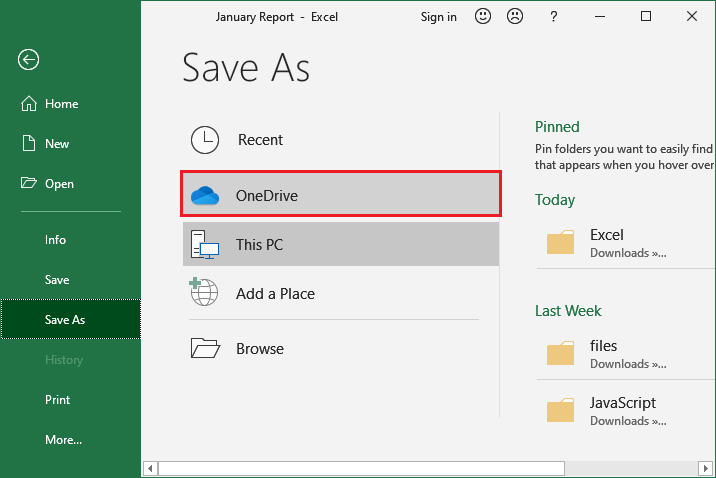
Step 5: Here, click on the OneDrive to upload and store your file on OneDrive cloud storage.
If you already have an account on Microsoft, log in with your registered email id and password. Otherwise, sign up to Microsoft account.
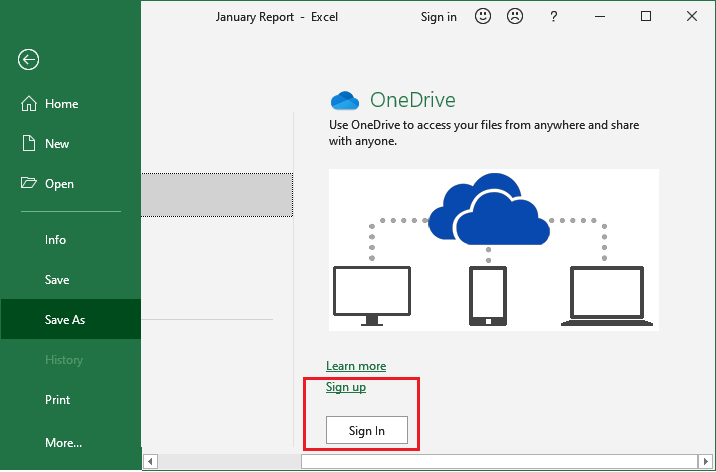
We already have an account on Microsoft. So, we will click on the Sign In button and login into it.

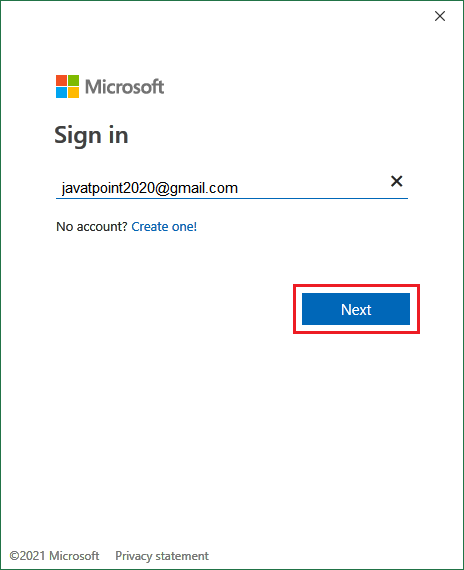
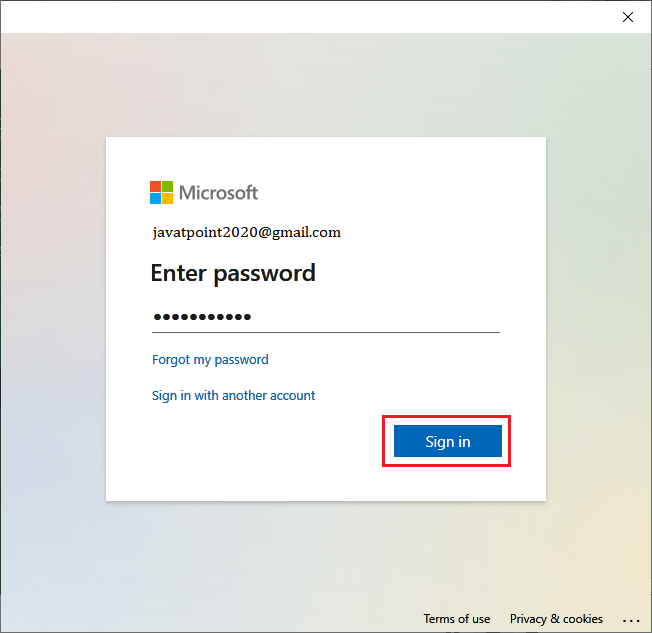
Step 6: Enter your Email Id and click on the Next button.
Step 7: Enter the password and click on the Sign In button.
Step 8: Unmark the Allow the organization to manage your device if you do not want Microsoft to manage your device and click on the OK button.
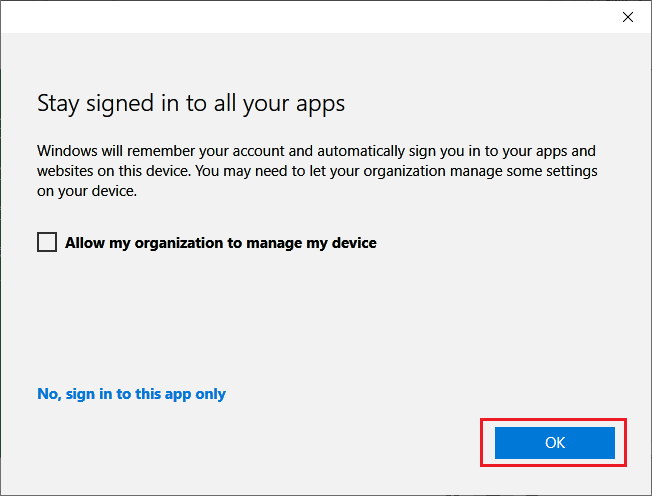
You have successfully signed in to your Microsoft account now you are all setup to upload and store your files backup on OneDrive.
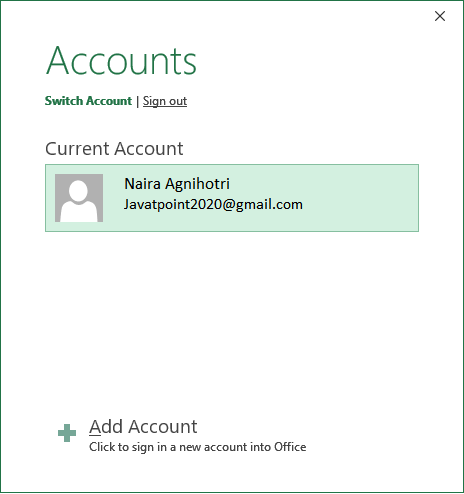
Step 9: After sign in, you will be moved to the Save as window, where if you double-click on the OneDrive icon, it will show you the signed account here.
OneDrive will show you the account linked with your Excel.
Skip Step 9 and move to the next step.
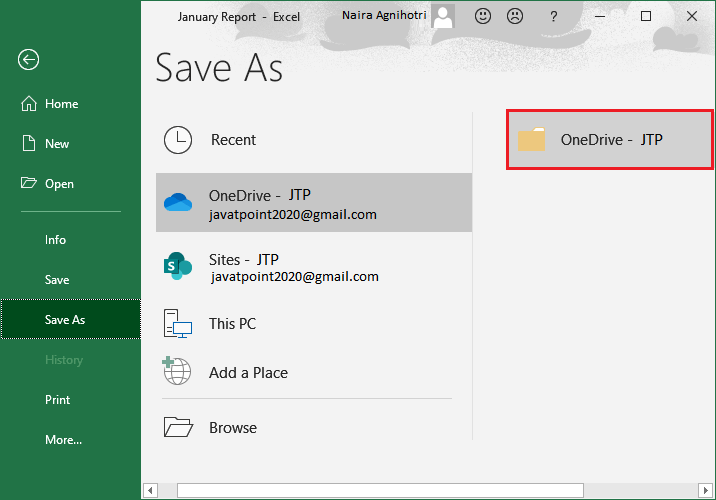
Step 10: Once again, click on the Save as and the OneDrive to save your file on Cloud.
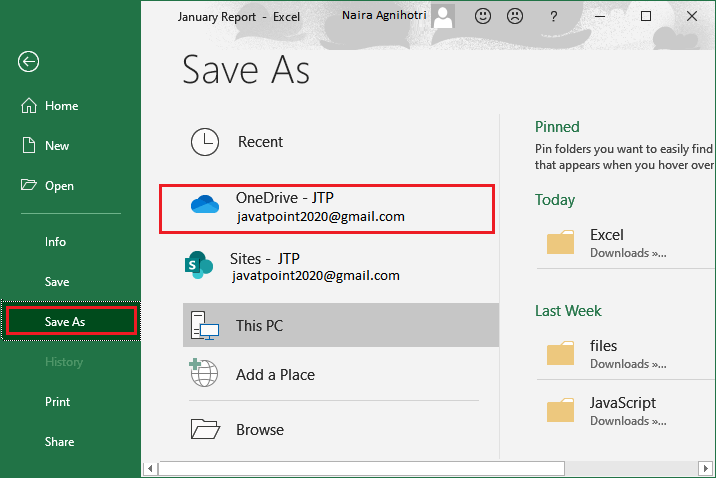
Step 11: Now, click on the OneDrive JTP at the right panel that will connect you to the server and allows you to keep a backup copy of your currently saving Excel file on OneDrive Cloud.
Note: Your device must be connected with interest so that your file can upload to the OneDrive server without any problem.
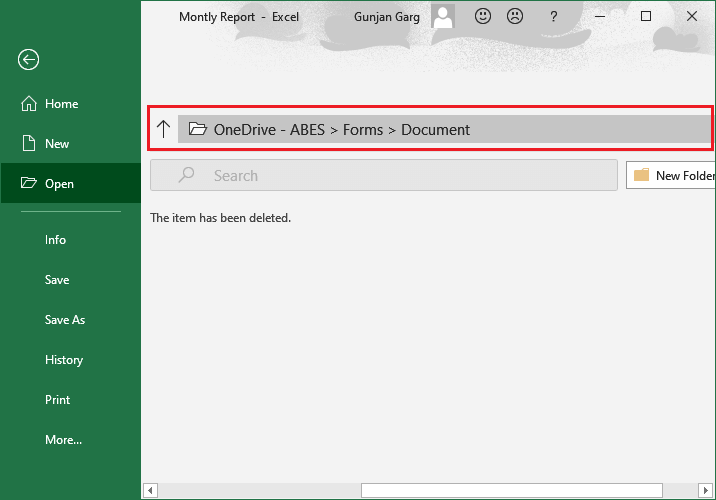
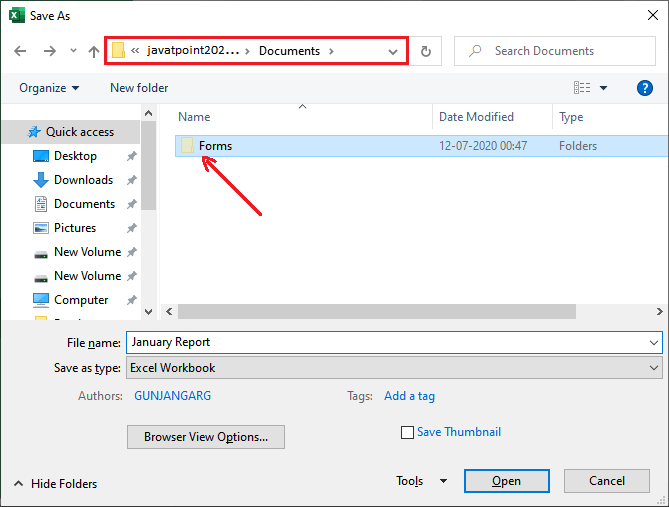
Step 12: Here, go inside the default Form folder, then Document, and then save your Excel file here. You can also see that this file is going to be saved inside [email protected] Microsoft account.
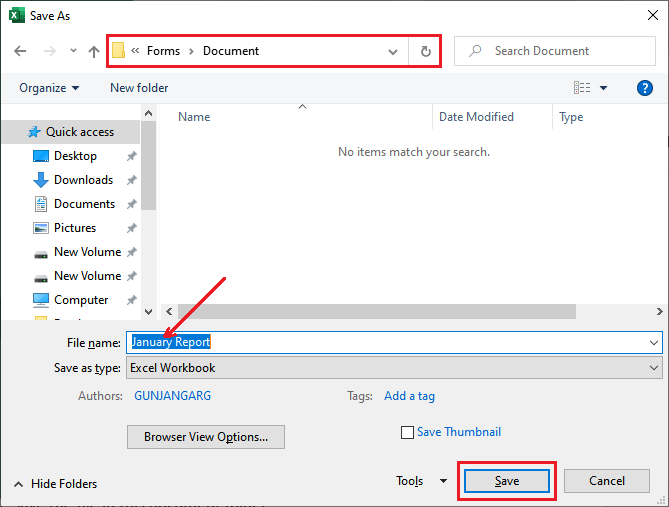
Step 13: Now, save the file in this Form>Document folder and click on the Save button.
Your file has been saved on the OneDrive cloud successfully. Next time, when you will save another file, you don’t need to sign again. Just follow the steps from step 10 and store the file on OneDrive as a backup copy. Directly save your file on OneDrive to keep a backup copy of your Excel file to prevent data loss.
You can get the most recent backup of your file. It automatically updates the file on your behalf.
Save file early to prevent data loss
It is not easy to get the data back or recover the unsaved files most of the time. However, there are various features available to recover a lost Excel file. But it might be easier for every user to save the file quickly after making any changes in file. Saving the file in every 2 – 3 minutes should be in habit.
Use Ctrl + S shortcut key to save your updated file data often. It will help you to overwrite the previous data and changes made in file.
It is the easiest way to prevent your data from loss. By saving the file quickly, the users will not face the data loss problems due to power cut issue, mistakenly closing the file without saving, or any other reason.
Use Auto Recovery feature to prevent data loss
Losing important data can be the loss of time and money as well. So, to prevent yourself from data loss, you can take a few precautions so that you can safe your data. You can save from data losing pain because it is difficult to recover exact data and time waste as well.
MS Excel provides an in-built feature of Auto Recover. This feature allows the users to set a time to save and auto recover the updated information in Excel file after a particular time, e.g., 5 minutes and more or less.
The default timing for Auto Recover is 10. You can change this auto-recovery time according to your need from settings.
Step
Navigate to File > Options > Save in Excel, where you will get this Auto Recover option.
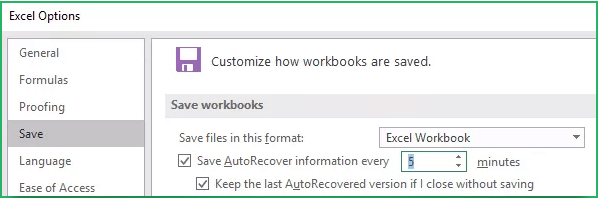
Excel will save a copy of your worked-in spreadsheet in every 5 minutes by setting the time here. Besides that, we will also recommend you to use Ctrl + S shortcut key to save your updated file by yourself.


