

#REF! Error in Excel
MS Excel or Microsoft Excel is a well-known spreadsheet program or software developed by the popular company Microsoft. It enables users to record financial data and perform desired calculations on specific recorded data sets using various existing functions or formulas. However, there may be cases when we do not get the expected results from the functions/formulas applied. Instead, Excel returns some random unexpected code in the corresponding cell(s). Such random unexpected codes are called Excel errors.

There are many error codes in Excel which are part of Excel error, and these codes usually appear on a case-by-case basis. A worksheet may contain one or more of these errors. The #REF! is one such error of Excel that we often encounter when working with functions and formulas within our sheet. Like other error codes, the #REF! error also appears due to some specific reasons, and we should follow the proper guide to fix or remove this error accordingly.
What is #REF! error in Excel?
The #REF! error of Excel is one of the formula errors that may occur for a few reasons related to used cell references. The #REF! itself represents the meaning of reference. In particular, the #REF! error is the result of invalid or non-existent references used inside the formula(s) in the sheet.
Excel reads the applied cells as invalid in the following scenarios:
- When a cell, row, column, or sheet is deleted.
- When a formula has incorrect cell references, such as the relative references are copied.
In both cases, since the formula (which was referencing the cell or a range before it got deleted) has no clue where to point, that original reference used in the formula changes to #REF!.
How to find #REF! error in Excel?
Before we learn to fix or remove the #REF! error from our worksheet, we must know to find them or their corresponding cells.
When we’re working with small data sets, the #REF! error becomes easier to detect. We can scroll through our worksheet and find the cells that contain the #REF! code instead of desired results according to the formula used. If we click on such cell(s), Excel will show a rectangular error box with an exclamation mark/sign inside it. Additionally, a small message appears saying what is wrong with the cell or the applied formula.
On the other hand, when we have large data in our worksheet, and if there are multiple #REF! errors, we must try any of the following methods to detect the error and fix them by following proper steps accordingly:
Using the Find & Replace Tool
Excel’s ‘Find & Replace’ tool works fine when we need to find any specific error in our worksheet. The tool searches the entire sheet to find and select the specified error. The advantage of using the ‘Find & Replace’ tool is that we can go through each error cell individually to fix or format it accordingly.
We have to perform the following steps to use the ‘Find & Replace’ tool to find and select the cells with #REF! error:
- First, we need to select the range of cells where we wish to locate for the #REF! error. We can press the keyboard shortcut ‘Ctrl + A‘ to select the entire sheet at once.
- After selecting the data, we need to navigate through the Home tab > Find & Select > Find.
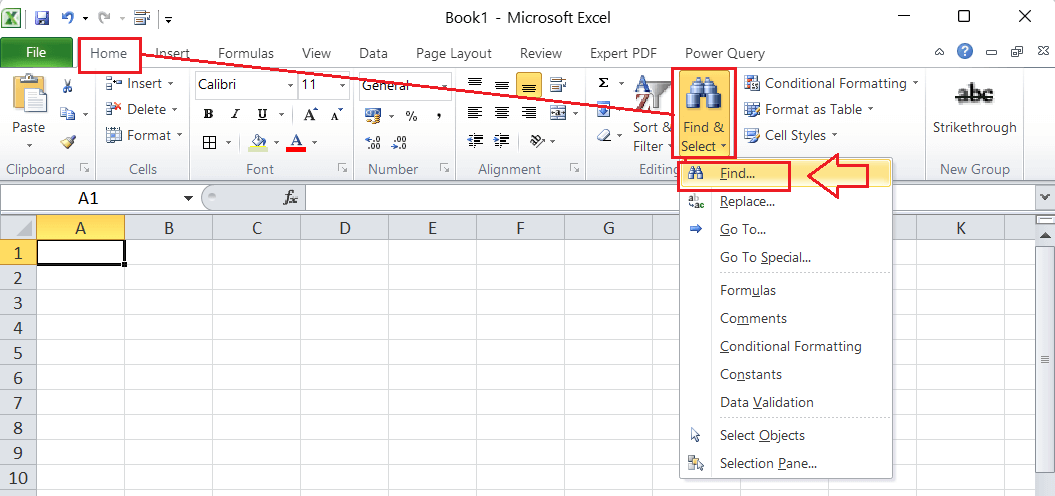

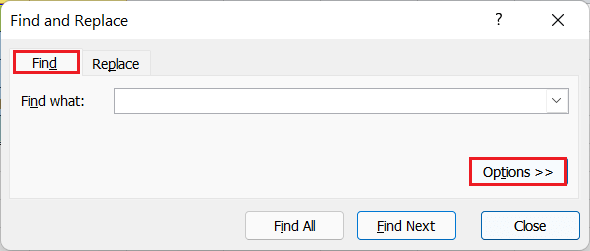
Alternately, we can use the keyboard shortcut ‘Ctrl + F‘. These methods will display the ‘Find & Replace‘ window with the Find tab selected. Here, we must click the Options button, as shown below:
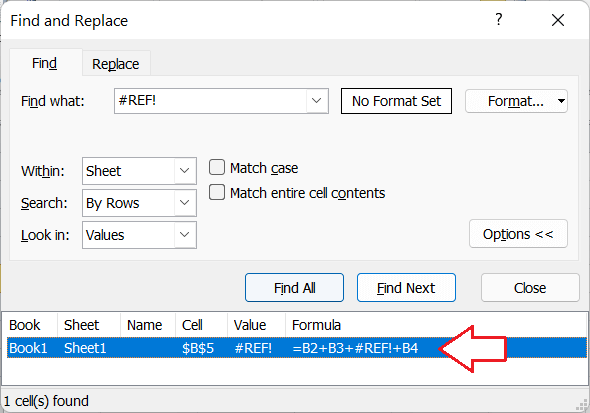
- Under the Find tab, we need to enter #REF! next to ‘Find what‘ and choose ‘Values‘ from the drop-down list next to the ‘Look in‘ option. After making the changes, we must click the ‘Find All‘ button.
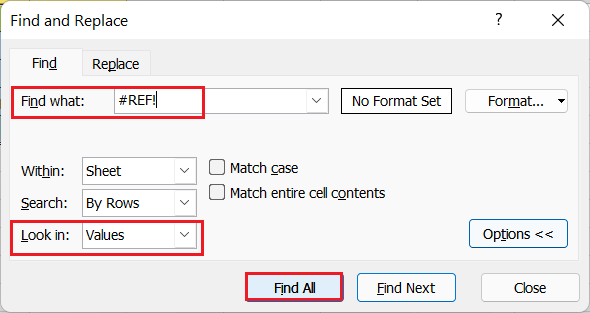
- Once we click the ‘Find All’ button, Excel displays a list below the current ‘Find & Replace’ window. The list displays the details of all the cells with the #REF! error within the selected range of data.
We can select one or more cells with errors from the list and take necessary actions like correcting respective errors or deleting them completely. Moreover, we can also use the ‘Find Next’ button instead of the ‘Find All’ button to go through each #REF! error cell individually.
Using the Go-To Special Tool
Another method to locate the #REF! error is to use Excel’s ‘Go-To Special’ tool. Using this tool, we can locate all the cells with the errors and accordingly select them. The tool not only finds cells with the #REF! Errors, but also other excel errors. In that way, if we have several errors of different types, this method will not be suitable to filter out only the #REF! errors. We have to manually filter #REF! error amongst other errors. In addition to this, if the error is present in the sheet as text, the tool will not select such cells.
We have to perform the following steps to use the ‘Go-To Special’ tool to find and select the cells with #REF! error:
- Like the previous method, we need first to select the range of cells where we want to look for the #REF! error. We can also select the entire sheet or contiguous/non-contiguous cells accordingly.
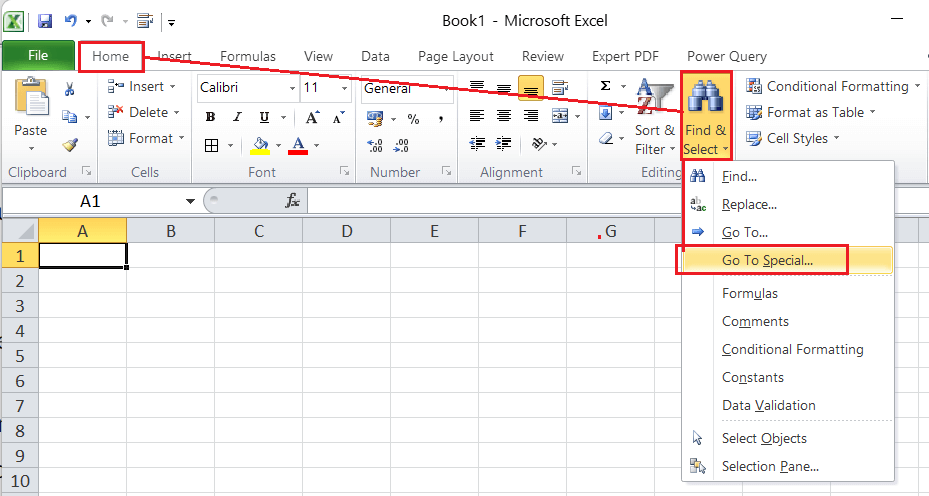
- After selecting the effective range, we need to go to the Home tab, click the ‘Find & Select‘ button and select the ‘Go-To Special‘ option from the menu list. This helps open the ‘Go-To Special’ window.
- Once the ‘Go-To Special’ window is opened, we must click the radio button associated with the ‘Formulas‘ option and select the ‘Errors‘ box. We must deselect all other boxes in the following way:
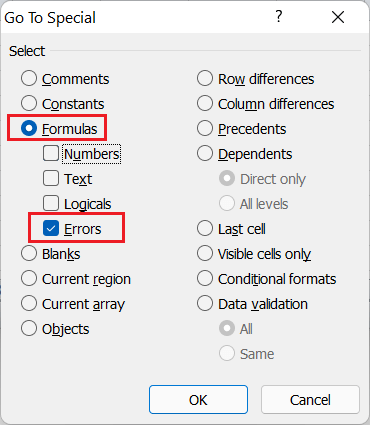
- Lastly, we need to click on the OK button to apply the preferences. This will select all the cells that have errors. We may check each located error to fix or delete them accordingly.
What are the reasons for #REF! error and how to fix this error?
When we have the #REF! error in our sheet, it is Excel’s way of saying that one or more references used within the formulas are invalid or unavailable. This specific error most commonly occurs because of deleted rows, columns, or worksheets. However, some other reasons also cause #REF! error. Fixing the #REF! error is just a matter of editing the respective formula(s) and correcting their references.
Let us know the most common reasons for why the #REF! error occurs within our Excel worksheet and the different ways to eliminate this error. They are:
Case 1: Removing a reference
When we remove any cell, row, column, or worksheet that we have supplied or referenced within the formula somewhere in a workbook, Excel displays a #REF! error in all such cells where the corresponding formula is used. It occurs because the element we are trying to refer to in our formula is not present anymore (the cell reference is removed or deleted). Therefore, Excel cannot find or use the respective data for the applied formula to produce results.
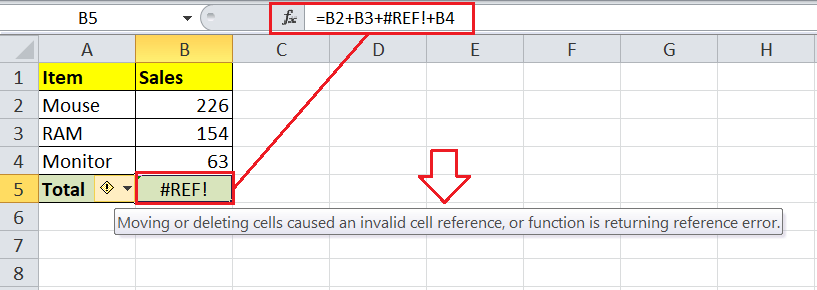
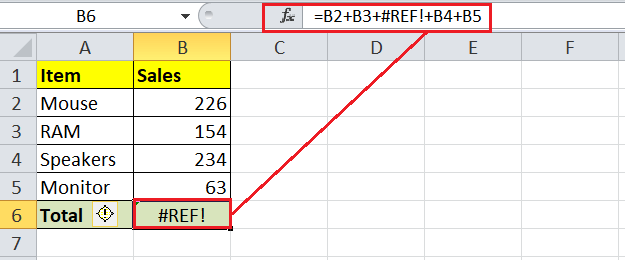
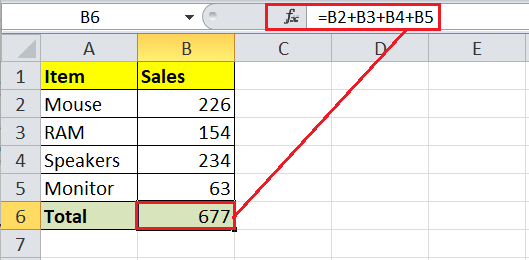
For instance, consider a sheet with some sales data where we have applied the addition operator to calculate the total sales.

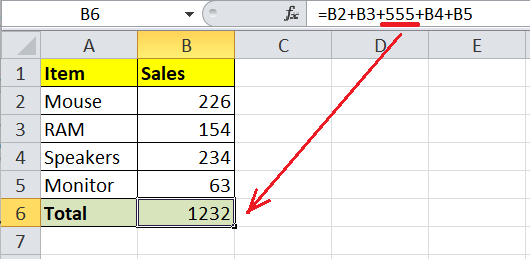
In the above sheet, the formula is working properly and giving the total sales values. Now, if we delete any row (let’s say 4th row), the total of sales will instantly change to #REF! error. After we delete the 4th row, the respective cell changes to #REF! in the formula, resulting the #REF! in the resultant/destination cell.
How to fix this?
To fix the #REF! error in this specific case, we must either edit the formula and include a valid reference or add the desired data directly in the formula in place of the referenced cell or #REF!.
In our example, if we edit the formula and remove the #REF!, we will get the total sales value for respective items.
However, if we have accidentally deleted the cell, row, or column, we can immediately undo the last action, and the error will be fixed. The undo feature does not help remove #REF! error in case of accidentally deleted sheets. In such cases, we must delete the references or add data. We will get the desired results if we add the data from the 4th row (i.e., 555) directly in our formula in place of #REF!.
Case 2: Copying a formula with relative cell references
When we copy any formula from one location to another and face #REF! error suddenly, it’s more probably the case of relative cell references. That means the formula we have copied to another cell includes the relative references, which are only applicable to the original cell. Once it gets copied to another cell, the references automatically change and cause the #REF! error.
For example, consider the previous example sheet again. The total sales are calculated using the SUM function in this case.
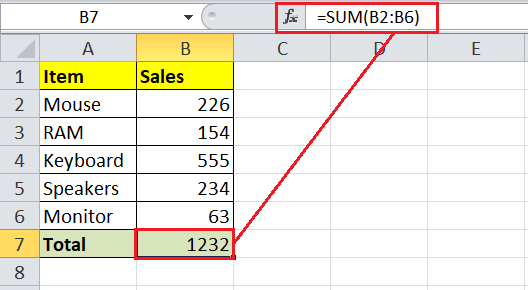
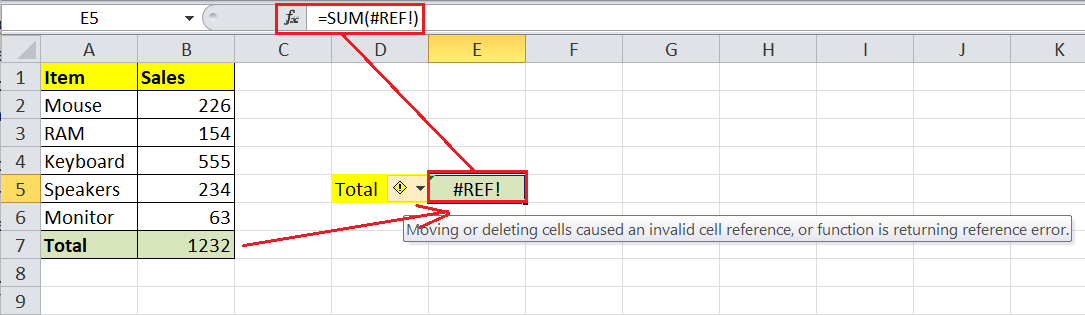
However, if we copy the SUM function from cell B7 to E5, the #REF! error appears. In this case, Excel assumes that we are referring to corresponding data related to column E.
How to fix this?
To fix the #REF! error in this specific case, we must edit or change the cell references by making them absolute. So, Excel will always refer to the same cell(s) used within the formula. This can be done by adding a dollar sign to the desired references. In our example, we must edit the formula in the original cell (B7) and include dollar signs in cell references. After that, our formula will look like this:

Now, we can copy-paste the formula to any other cell in the sheet, and the result will be the same as the original cell.

Case 3: Incorrectly using the VLOOKUP function
Another typical case that causes #REF! error is the using of the VLOOKUP function incorrectly. However, there is a slightly different reason or variation for getting the error. That means when using the VLOOKUP function, the #REF! error does not usually occur because of the wrong specified range. Instead, it occurs when we specify a column incorrectly.
For example, let us again consider the same example where we have sales of some items. However, instead of summing the sales, we now apply the VLOOKUP function to find the sales of any specific data. In the below example sheet, the VLOOKUP function returns the #REF! error instead of the specified sales of the respective item.
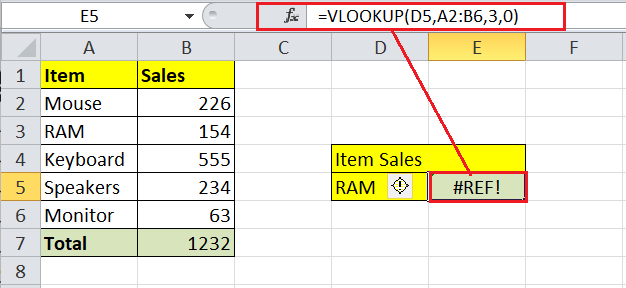
In the above sheet, the VLOOKUP function is returning the #REF! error because we have referenced the third column (3) in place of the col_index_num argument. The particular argument is not the part of the array specified in place of the second argument in the formula. Therefore, the respective function does not find the concerned data because of the missing column (the second column), resulting in the #REF! error.
Like the VLOOKUP function, we may also encounter the #REF! error while using the wrong row or column reference in the INDEX function.
How to fix this?
When using the VLOOKUP function in our sheet, we must use the proper syntax and supply proper arguments and a range. In our example, we need to reference the second column in the col_index_num argument because the third column has no concerned data. Therefore, if we edit the VLOOKUP function and change the third argument from 3 to 2, the formula works without the error.

Avoiding or Preventing #REF! error
The best option to avoid #REF! error (s) is to prevent it from occurring in the first place. If there is a need for deleting a cell, row, column, or sheet, we must ensure or check that they are not part of the applied formula (s) in the sheet. Moreover, if we are copying-pasting the existing formula to other cells, we may usually require to convert some cell references to absolute references accordingly.
It is always a good practice to fix or remove the #REF! errors as soon as possible. It may become very difficult to fix this error in some cases. Suppose we accidently delete any row and suddenly the #REF! error occurs in our sheet. We can usually press the keyboard shortcut ‘Ctrl + Z’ to revert the changes, i.e., undo the row deletion. This will also fix the #REF! error because the desired data by formulas is again available.
However, if we strictly need to remove that specific row, column, or cell, we must edit the respective formula (s) to exclude that specific row, column, or cell we need to delete. Also, we can move the data to other locations to use the desired data. After that, we can delete the column and ensure that no cell(s) with #REF! error are left.
Important Points to Remember
- We must always keep a copy of the workbook before deleting one or more worksheets. It is because we cannot get the deleted sheet back. Our only chance to get the data back is to re-open the file from the last saved location by Excel. However, this cannot be trusted.
- When we have multiple #REF! errors in our worksheet, and we need to clear or delete them at once, we can use the ‘Find & Replace’ tool. We must type #REF! in the ‘Find what’ box, keep the ‘Replace with’ box empty and click the ‘Replace All’ button. We can also replace the error with a zero (0), dash (-), or any other meaning text or format, depending on the specific cases.


