How to recover unsaved Excel file?
While working with an Excel file, if Excel is unexpectedly closed without saving the data, you may worry about data. It can be because of system crashes or a file opened too long. Hence, it may lose the hours of work you had done in that workbook. The first thing that comes to one’s mind is how we can recover the unsaved file.

The Office software enables its users to recover the unsaved file in Excel, Word, and other softwares. Excel has default auto-recovery options using which the lost data can be recovered of the unsaved file.
This chapter will explain the methods to recover the unsaved Excel file. We are going discover the following methods for the recovery of the unsaved or overwritten files:
- Configure the auto-recovery setting
- Recover the unsaved Excel file
- Recover the overwritten Excel file (Within Excel)
- Recover the overwritten Excel file (From cloud)
- Configure the auto-backup setting
- Important things to know for auto-backup feature
Configure the auto-recovery setting
Although Excel provides the auto-recovery settings by which the unsaved Excel file can be recovered that is lost because of system crash or accidental close. For this, Excel users have to configure this setting.
Know the one thing that – this configuration setting works only for those files that have been saved at least once. You can configure the setting for auto-recovery by following a few simple steps:
Step 1: On the Excel sheet, click the File tab to go to the Excel backscreen.

Step 2: Here, click More and then Options on the left side panel.
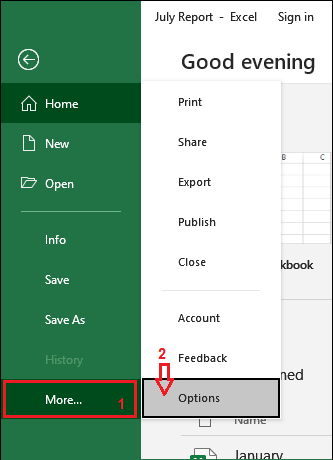
Step 3: A panel below like will open on which move to the Save tab in the left sidebar.
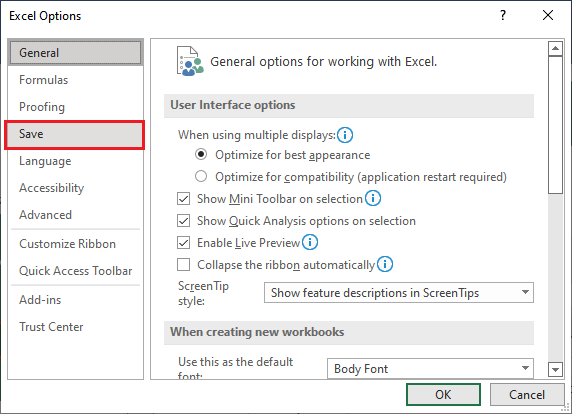
Step 4: On this window, mark the following checkbox if they are not marked:
- Save AutoRecover information every _ minutes
- Keep the last autosaved version if I close without saving
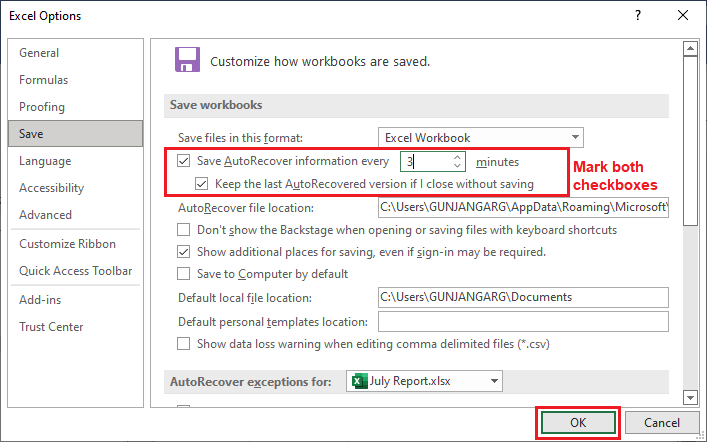
Step 5: Also set the file location for the recovery files. The Excel will automatically select this location while saving the auto-recovered Excel file. In the end, click OK.

Choose the recovery time to smallest, we have selected 3 minutes for now. Default is 10 minutes, you can change it to 1 minute. After configuring these settings, you will find your Excel file auto-recovered after the system crash at this location. This field is available on the save tab.
As we told you, it applies only on at least once a saved file. So, the below method will work for the files which are not saved.
Recover the unsaved Excel file
In case the Excel file is not saved ever, this method will let you out to recover the unsaved Excel file. If the file is not saved and closed accidently due to a system crash or other reason, you can still recover that file.
Before following the steps to learn the recovery of an unsaved file, let’s first create a file and does not save it.
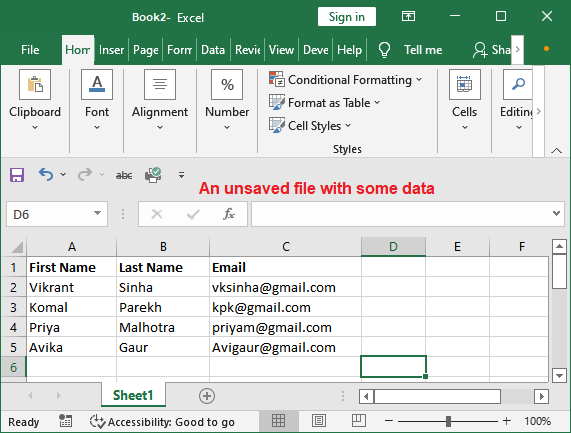
Keep this file at least for the time you had set to auto-recovery, i.e., 3 minutes.
Steps to recover the unsaved Excel file
Now, you can recover the file that you might forget to save by using the below steps:
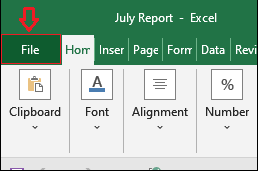
Step 1: First of all, open MS Excel and click the File tab to redirect on the Excel backscreen.
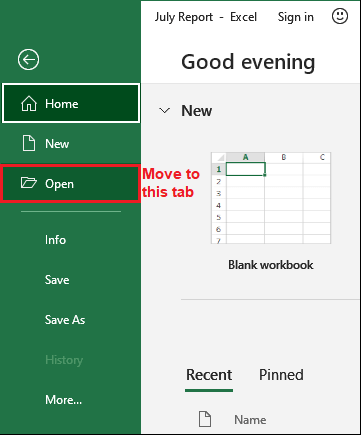
Step 2: On the left sidebar, click the Open tab.
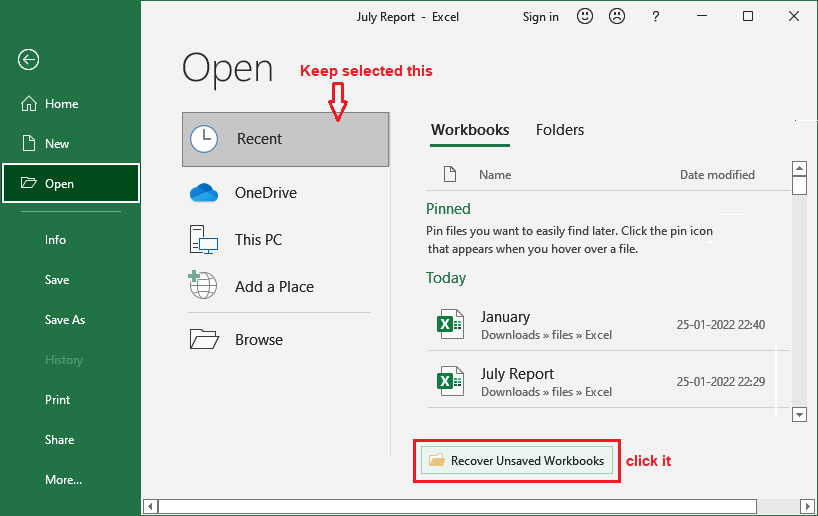
Step 3: Keep selecting the Recent option and scroll down to the end of the screen, where you see an option named Recover Unsaved Workbooks. Click this option.
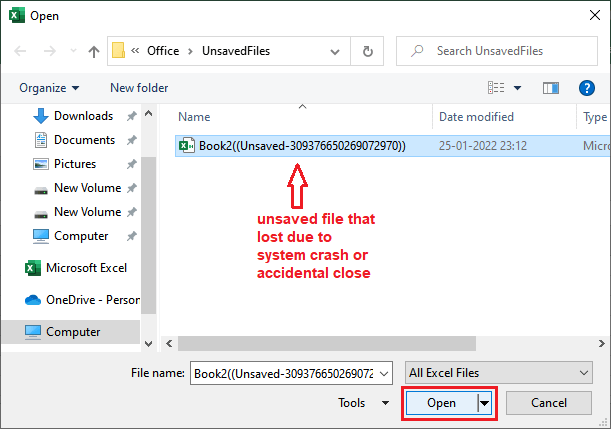
You will automatically navigate to a location in your system which you have set for the unsaved recovery files.
Step 5: Now, search for the file you lost because of unsaved action and double-click on it to open.
Step 6: The unsaved Excel document will open in the MS Excel software. You will see a message (This is a temporary file that is temporarily stored on your computer) along with Save As button below the Excel ribbon.
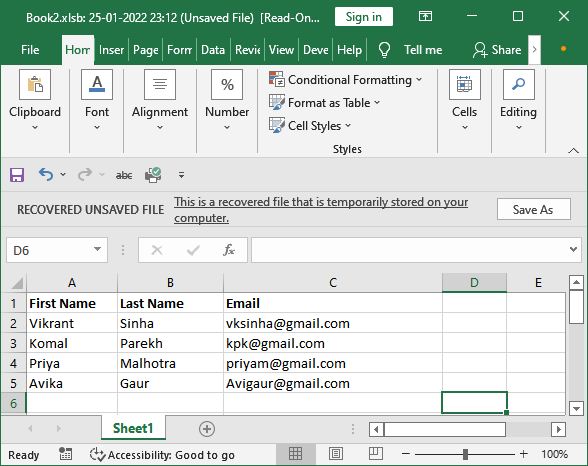
Now, you can save this file and keep safe your data from loose. Save the file by clicking the Save As button and make changes to it, if any. This recovered file was the file that had never been saved even for once.
Recover the overwritten Excel file (Within Excel)
The methods discussed above are for the files lost due to power cut or accidental Excel close. Both those methods help to recover the unsaved data.
Now, we have another scenario like – we have an existing Excel file in which you have updated some data and saved it again. But now you want the previous version of the file as you do not want changes any more you have done.
It happens most of the time with all users. However, Excel has UNDO command to get back to the previous data. But it does not always work, such as when the file gets corrupted. So, what we can do to get the previous version of the already saved file.
Follow the steps to recover the previous version of overwritten Excel file:
Step 1: We take an Excel sheet having six employees records initially. We have removed row7 data from this file and made some other changes, then saved it again.
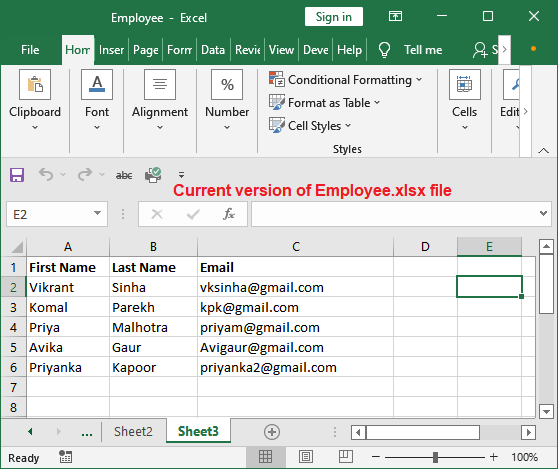
But now, we want the previous version of the file. This is the current version of the file saved on my computer.
Steps to recover the overwritten file
When you open the Employee file again, the data has been lost as it was unsaved. So, the below version helps you to recover the previous version of this file.
Step 2: Click the File tab to redirect on the Excel backscreen.

Step 3: On the Excel backscreen, go to the Info tab and click the Manage Workbook, then select Recover Unsaved Workbooks.
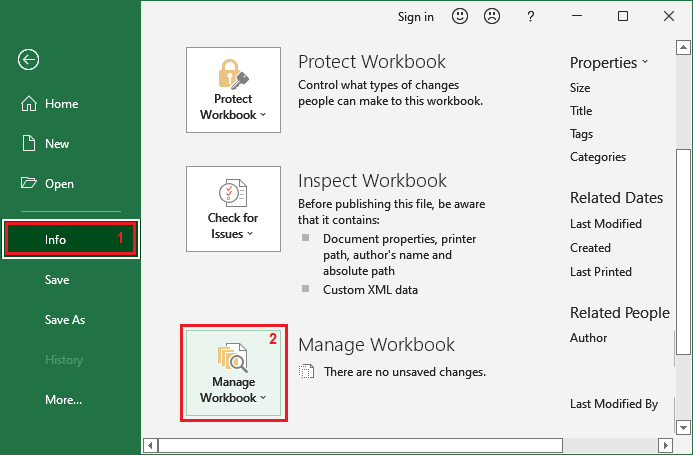
Step 4: Go to the location set for the auto-recovery file. Here, you will see all the previous versions for that targeted file.
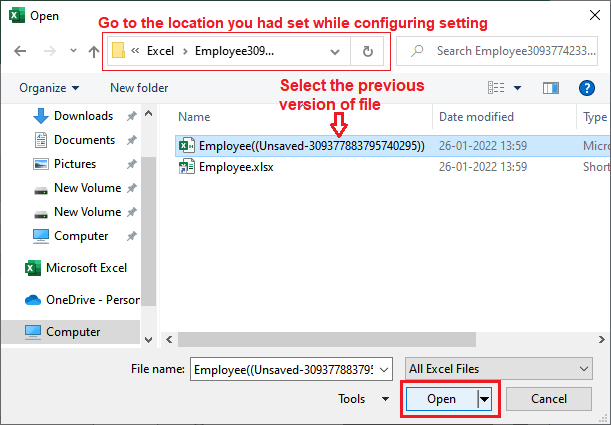
Click one of the versions of the file you want to restore and click Open.
Step 5: The selected version of the targeted Excel file (Employee.xlsx) will open. Now, you can save this version of the file with a new name.
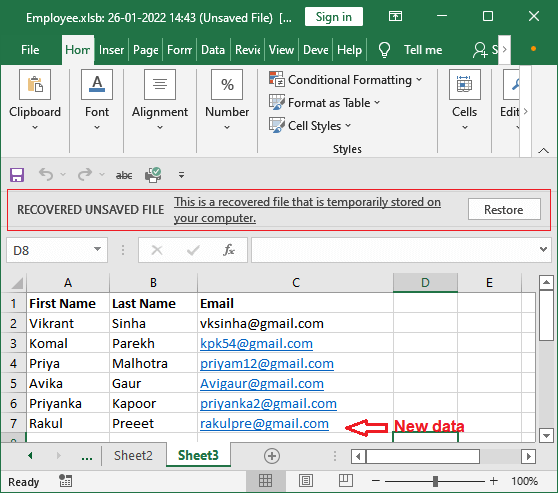
“See that the previous version of the Employee.xlsx has been recovered containing six records this time.“
Step 6: When you click the Restore button in the previous step, a popup will show you like below. Click the OK button to overwrite the Employee file.

Step 7: When you click the OK button, the previous version of the Excel file merges with the original file.
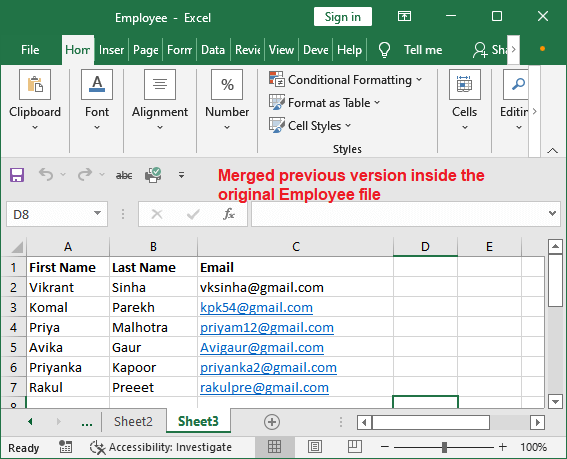
This was how to recover the previous version of the existing Excel file when you do not want the recently updated data. Basically, it helps to recover the overwritten file. By performing these steps, you can recover the Excel file within Excel.
When you select a previous version of the file and it opens, you will see a prompt in that file below the Excel ribbon. Click on the Restore to get the previous version of the file.
Recover the overwritten Excel file (From cloud)
We have already discussed the method to recover the previous version of overwritten file within Excel. But what if the data is lost from the Excel and you do not find the previous versions of the Excel file inside the Manage Workbook. Excel has another way to recover the overwritten file.
You can take backup of the Excel file on the cloud storage so that it will contain the previous version of the Excel file. Whenever you need the previous version of Excel file, you can download it from there. Now, let us see how we can take backup of the Excel file and use it to recover the previous version of the overwritten Excel file.
This will also help to recover the deleted Excel file as well if you took backup of that file. It will also keep each version of the file.
Steps to get the backup file from OneDrive
First of all, you have to take backup of the Excel file on the cloud (OneDrive) storage by saving that file on cloud too.
Step 1: Click on the File tab.

Step 2: Here, click the Open on the left side panel and then click the OneDrive to open the backup file from the cloud.

“If you have not signed in on your cloud storage. At the very first, login to it.“
Step 3: On the cloud storage, right-click on the current version and then click the version history.
Step 4: A file will open in Excel and all other previous versions of the file will show in the left pane of the Excel sheet.
Step 5: Click one of the versions of the file you want. The file data will show you and you will also find an option to download this file from the cloud to local storage.
Step 6: Click the Download button to save this file to your system, or you can say restore it.
Configure the auto-backup setting
The Excel user needs to configure the setting for the auto-backup of the Excel file. Once you configure this setting, Excel will auto-backup the file whenever the file gets saved.
Autosave or auto recover feature is helpful to automatically save the changes you are doing in the Excel file even if you do not save it. Auto-backup is something that automatically takes the backup of the saved Excel file. Basically, it creates a backup of the Excel file by creating a copy of the file when you save it.
Hence, you can recover it from the backup copy when your data is lost. Configure the auto-backup setting using below steps:
Step 1: Firstly, open the Excel file for which you want to configure this setting or create a new one and click the File tab on this file.

Step 2: Click the Save As on the left sidebar and then click the Browse.

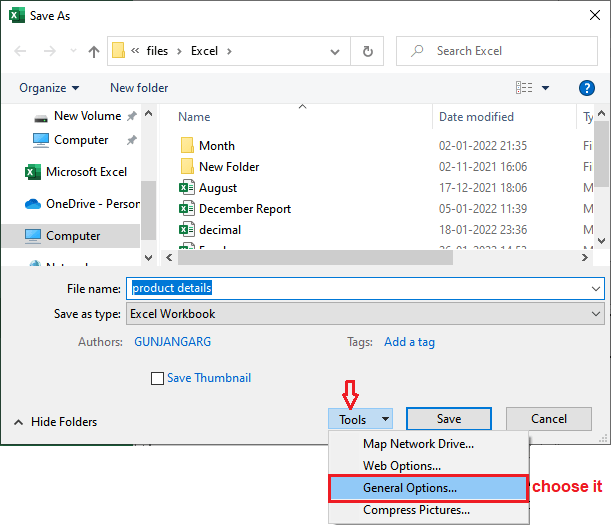
Step 3: A dialogue box to save the file with a new name will open. But here, you click the Tools option and select the General Options from the dropdown list.
Step 4: A dialogue box will open again where check the Always Create Backup option and click OK to close it.
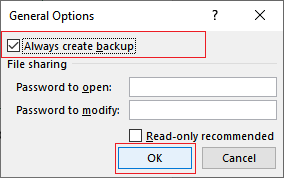
Note: You can also set a password to open and modify the targeted Excel file (on which you are configuring this setting).
Step 5: Now, give a name to the file and save the file on a desired location in your system and click the Save button.
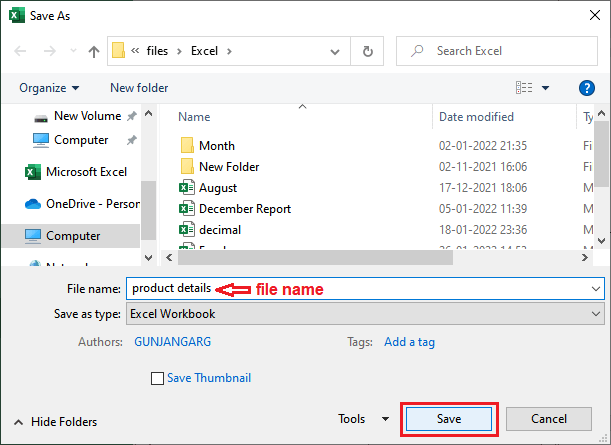
Step 6: If you are configuring this setting for an existing file, a popup will open like below asking to replace the previous file.
Click Yes on this to keep the configured setting for this file.

Whenever you will make any change in this file and save it, a copy of this file will be created for the backup. This saved will be named as ‘Backup of filename‘. The filename is the name of the file whose back is created and Backup of is prefix for the backup file.
Step 7: We made change in the file and saved it. You will see that a backup of that file has been automatically created for that file and stored in the same folder.
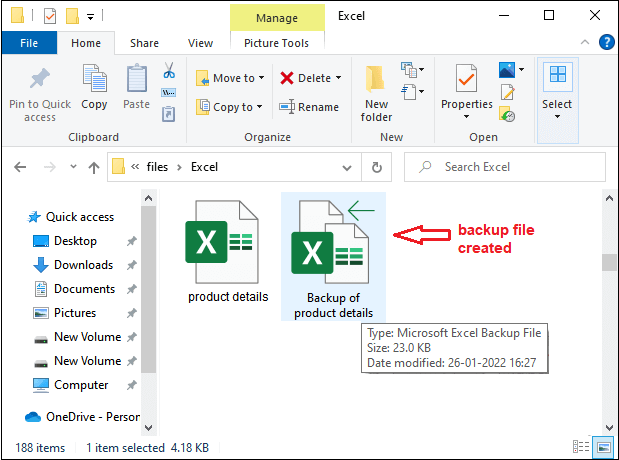
By following the same steps and unmarking the Always Create Backup checkbox inside the General Options, you can stop taking the backup for the Excel file.
Important things to know for auto-backup feature
For auto-backup functionality, you may know the following thing to use it properly:
- This configuration setting works only for one workbook for which you have configured. So, you may call it as workbook level setting.
- It means it will take backup only for configured files. If you want for other files too, you have to manually set for those files separately.
- It is not the same as the auto recover and auto-save option you read above. These are configured independently and do not reflect the process of each other.
- The automatically created backup file is saved with .XLK extension whose name is like “Backup of filename“. Backup of is the prefix for each backup file.
- The backup file is always one version prior to the current version of the file. It means that the new backup file will not create again for the same file. Only one backup copy will remain and changes will update in that file.


